Pleased to launch the new version of RecentX. The new version is called Filezo.
Filezo gives you speedy access to any file, folder or app on your Windows PC with just few keystrokes. You can jump to any file/folder without browsing into deep hierarchy. Within 3-5 seconds. Saves enormous time! And money of course. That’s not it. Tag files and folders to group them, color code them for quick identification. And much more.
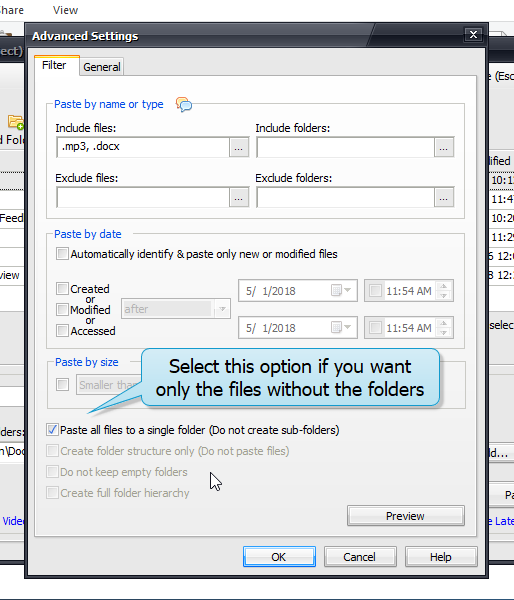
Hey Guys! In this blog post we will see how to copy files without their folders. This approach is particularly useful when working with large collections of files, as it enables you to focus on the specific files you need, rather than navigating through multiple layers of folders.
Let’s take a look on how to achieve this using Copywhiz first.
What is Copywhiz?
Copywhiz enhances your file-copy experience by letting you to have more flexibility & control over the file copying and backup process.
In the Source field, browse to the folder containing the files you want to copy.
In the Destination field, choose the folder where you want to place the copied files.
In the Operation Mode, select Diff (No Overwrite) or Copy.
Ensure that the Filter option is set to *.* to copy all files.
Uncheck Include Directory to prevent copying the folder structure.
Click Execute to start copying the files.
Conclusion
Copywhiz comes with a steep learning curve and lacks the flexibility and convenience. Copywhiz stands out with its intuitive interface, advanced filtering options, and unique “Paste without folders” feature. Whether you’re a casual user or a professional, Copywhiz transforms file copying into a hassle-free experience.
Hey Guys! In this blog post we will see how we can sync files between source and destination folders. Keeping files synchronized is crucial for backup, file organization, and data consistency.
What is Copywhiz?
Copywhiz enhances your file-copy experience by letting you to have more flexibility & control over the file copying and backup process.
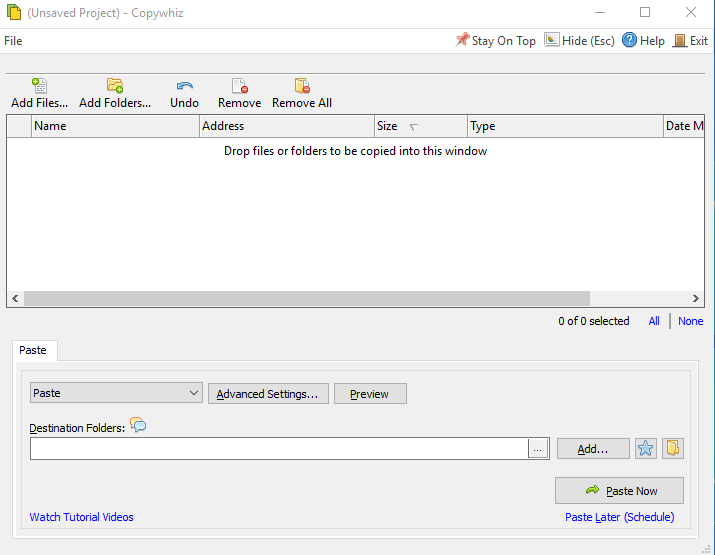
1. After you select your files in Copywhiz, go to the destination folder and Choose ‘Copywhiz -> Paste Advanced’.
2. The Copywhiz main window will open. Choose the Advanced Settings Tab from there.
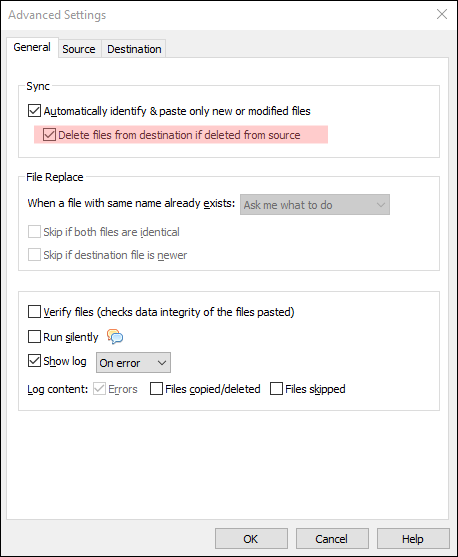
3. Go to the General Tab and choose the option ‘Automatically identify & paste only new or modified files’. After that, select the option ‘Delete files from destination if deleted from source’.
4. Click on OK and proceed with ‘Paste Now’ option. The files will be pasted and the folders will be set to sync.
5. Save the project to run it again in the future.
The next time you make any changes in the source folder, run the saved project file. The folders will sync and the changes will be reflected in the destination folder as well.
We will take a look at how to use Robocopy to sync files between source and destination folder.
Step-by-Step Guide to Using Xcopy
Open Command Prompt
Press Win + R, type cmd, and hit Enter.
Use the following Xcopy command:xcopy "C:\SourceFolder" "D:\DestinationFolder" /D /E /C /Y
Explanation of the switches:
/D – Copies only newer files.
/E – Copies all subdirectories, including empty ones.
/C – Continues copying even if errors occur.
/Y – Suppresses confirmation prompts when overwriting files.
Run the Command
Press Enter and wait for the process to complete.
Files will now be copied only if they are newer than those in the destination folder.
Conclusion
Copywhiz provides simplicity and convenience for everyday tasks.
Hello guys! Syncing files between source and destination folders ensures data consistency and accuracy across different locations. In this post we will show you how to achieve this using Copywhiz and Fastcopy.
Let’s check out how to sync files between source and destination folder using Copywhiz:
What is Copywhiz?
Copywhiz enhances your file-copy experience by letting you to have more flexibility & control over the file copying and backup process.
1. After you select your files in Copywhiz, go to the destination folder and Choose ‘Copywhiz -> Paste Advanced’.
2. The Copywhiz main window will open. Choose the Advanced Settings Tab from there.
3. Go to the General Tab and choose the option ‘Automatically identify & paste only new or modified files’. After that, select the option ‘Delete files from destination if deleted from source’.
4. Click on OK and proceed with ‘Paste Now’ option. The files will be pasted and the folders will be set to sync.
5. Save the project to run it again in the future.
The next time you make any changes in the source folder, run the saved project file. The folders will sync and the changes will be reflected in the destination folder as well.
We will take a look at how to use Robocopy to sync files between source and destination folder.
Hey Guys! Data integrity is crucial when copying files, especially when handling large amounts of data or transferring critical files. In this guide, we will walk through how to achieve this using Copywhiz and Teracopy to verify data integrity.
What is Copywhiz?
Copywhiz enhances your file-copy experience by letting you to have more flexibility & control over the file copying and backup process.
Install the software following the on-screen instructions.
Step 2: Copy Files Using TeraCopy
Open TeraCopy.
Click + Files or + Folder to add the files or folders you want to copy.
Select the destination folder.
Click Copy or Move to start the transfer.
Step 3: Verify File Integrity
Once copying is complete, TeraCopy automatically performs a CRC (Cyclic Redundancy Check) to compare the original and copied files.
If there are discrepancies, TeraCopy will highlight the errors, allowing you to retry or fix the issues.
Conclusion:
Copywhiz is an effective tool for verifying file integrity in Windows. It is perfect for those who value convenience and need advanced features like automated verification and detailed logs.
Choose the tool that best fits your workflow and enjoy peace of mind knowing your files are copied securely and reliably.
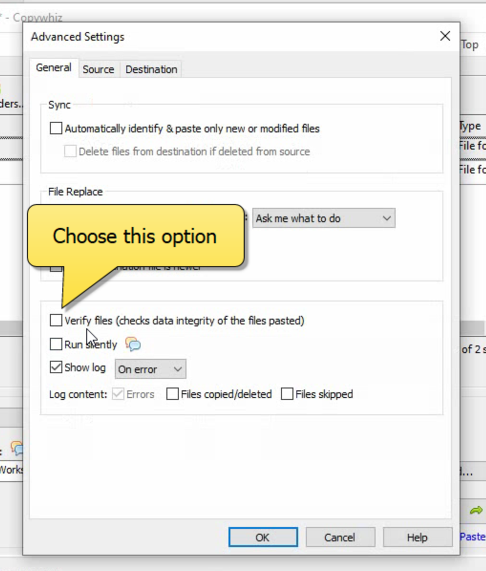
Hello Guys! When files are copied, factors like interruptions, hardware failures, or system crashes can lead to corrupted or incomplete copies. Verifying data integrity ensures that the copied files are exact duplicates of the originals, preventing data loss or corruption.
Let’s check how to achieve this using Copywhiz first.
What is Copywhiz?
Copywhiz enhances your file-copy experience by letting you to have more flexibility & control over the file copying and backup process.
Install the software following the on-screen instructions.
Step 2: Copy Files Using FastCopy
Open FastCopy.
Select the Source folder or files.
Select the Destination folder where you want to copy the files.
Choose a transfer mode (default is usually sufficient).
Click Execute to start the copying process.
Step 3: Verify File Integrity
FastCopy includes a Verify option that checks the integrity of copied files by comparing hashes.
Ensure that Verify is enabled before starting the copy process.
After the transfer, FastCopy will display a report showing whether all files were copied correctly.
Conclusion:
Copywhiz is an effective tool for verifying file integrity in Windows. It is perfect for those who value convenience and need advanced features like automated verification and detailed logs.
Choose the tool that best fits your workflow and enjoy peace of mind knowing your files are copied securely and reliably.
Hi Guys! When copying files in Windows, you might want to extract files from multiple directories and place them into a single folder without retaining the original folder structure. This can be achieved using Copywhiz and Xcopy.
Let’s take a look on how to do this using Copywhiz.
What is Copywhiz?
Copywhiz enhances your file-copy experience by letting you to have more flexibility & control over the file copying and backup process.
This command will copy all files from the Projects folder and its subdirectories into D:\Backup, but will keep the subfolder structure.
Conclusion
Copywhiz comes with a steep learning curve and lacks the flexibility and convenience. Copywhiz stands out with its intuitive interface, advanced filtering options, and unique “Paste without folders” feature. Whether you’re a casual user or a professional, Copywhiz transforms file copying into a hassle-free experience.
Hello everyone! Copying files without their folders in Windows allows you to easily extract and transfer files while maintaining a clutter-free destination. In this blog post we will show you how we can use this feature using Copywhiz and Teracopy.
Let’s take a look on how to achieve this using Copywhiz first:
What is Copywhiz?
Copywhiz enhances your file-copy experience by letting you to have more flexibility & control over the file copying and backup process.
Open File Explorer and navigate to the folder containing the files you want to copy.
Select all the files (you can also select specific files) and right-click.
Choose TeraCopy > Copy.
Navigate to the destination folder where you want to place the copied files.
Click Paste in TeraCopy.
Ensure that the Preserve Folder Structure option is disabled so that only files are copied without maintaining the original directories.
Conclusion
Copywhiz comes with a steep learning curve and lacks the flexibility and convenience. Copywhiz stands out with its intuitive interface, advanced filtering options, and unique “Paste without folders” feature. Whether you’re a casual user or a professional, Copywhiz transforms file copying into a hassle-free experience.
Hello Guys! Copying files without their folders helps to prevent unnecessary duplication of folder structures, making it easier to organize and manage your files across different locations.
Let’s take a look at how to achieve this using Copywhiz first:
What is Copywhiz?
Copywhiz enhances your file-copy experience by letting you to have more flexibility & control over the file copying and backup process.
This command will copy all files from the Projects folder and its subdirectories into D:\Backup without keeping the folder structure.
Conclusion
Copywhiz comes with a steep learning curve and lacks the flexibility and convenience. Copywhiz stands out with its intuitive interface, advanced filtering options, and unique “Paste without folders” feature. Whether you’re a casual user or a professional, Copywhiz transforms file copying into a hassle-free experience.
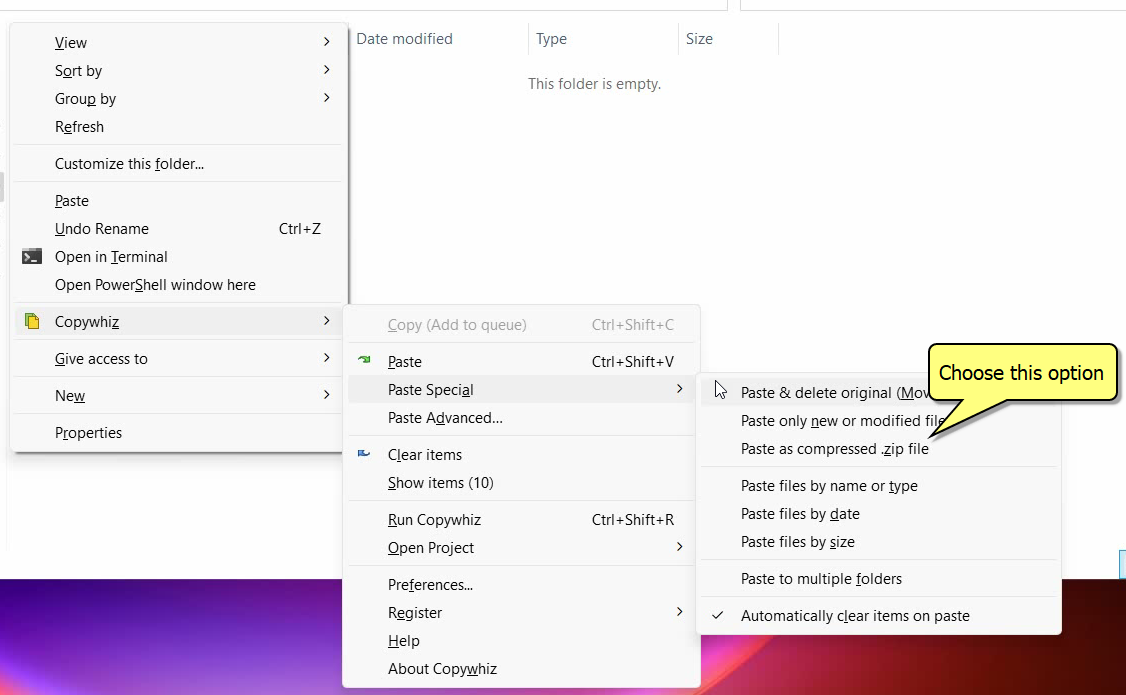
Hey Guys! Managing files across multiple folders can be a challenge, especially when you need to pick specific file types and compress them into a ZIP file. This guide will walk you through how to achieve this using both Copywhiz and PowerShell.
Let’s take a look on how to achieve this using Copywhiz:
What is Copywhiz?
Copywhiz enhances your file-copy experience by letting you to have more flexibility & control over the file copying and backup process.