Hello! When files with same name already exist in the destination folder, option to rename the source file or destination file can ensure uninterrupted and safe way of copying and backing up files. This guide will show you how to automatically rename duplicate files using Copywhiz and PowerShell.
What is Copywhiz?
Copywhiz enhances your file-copy experience by letting you to have more flexibility & control over the file copying and backup process.
Here is how Copywhiz makes file copying a breeze:
- Copy only new or modified files
- Easily pick files by name, extension, folder etc from bunch of folders
- Automatically organize files based on file attributes and metadata
- Copy files to multiple folders/computers
- Copy files from multiple folders and paste them at once
- Sync files between source and destination
- Pick files from multiple folders and compress in single .zip file
- Schedule file backups
- Verify copied files for data integrity
- Retain security attributes of files & folders (ownership/user access)
- Several more hidden nuggets designed to make your file-copy task easier.
Transcription:
- Select files using Windows Explorer, right-click on them and choose Copywhiz->Copy from the menu.
- Go to the destination folder, select Copywhiz–>Paste from the menu.
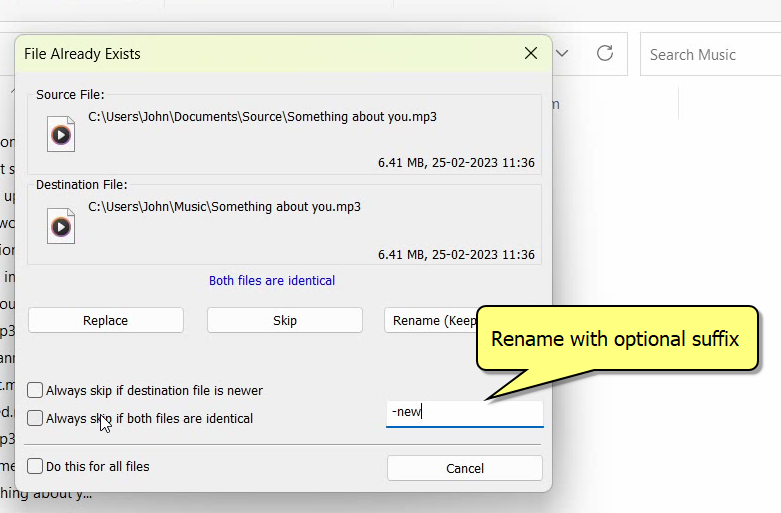
- While copying, if files with duplicate names exist, the ‘File Already Exists’ dialog box will appear which will show the details of the duplicate files.
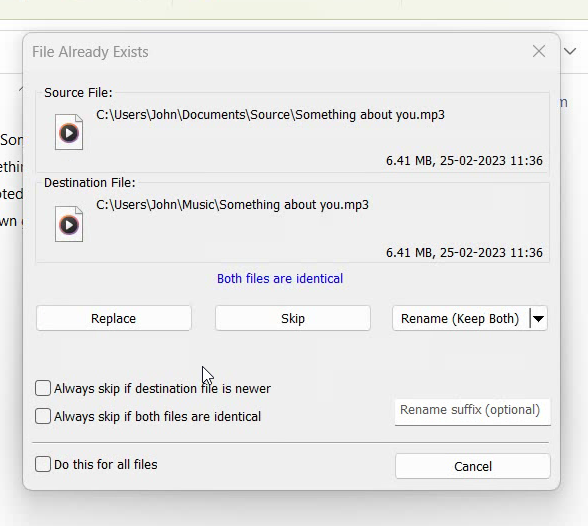
- Click on the Advanced button placed in the bottom-left of the ‘File Already Exists’ dialog box. Tick the option to rename the destination file with a suffix instead of overwriting it. You can apply the suffix to all duplicate files by enabling the option Do this for all files. And finally click on Rename button. Once the files are copied, you will see duplicate files renamed successfully.
That’s it in this video.
Let’s have a look on step by step process using PowerShell.
Using PowerShell:
- Open PowerShell:
- Press
Win + Xand select Windows PowerShell or PowerShell (Admin).
- Press
- Navigate to the folder containing duplicate files:
cd "C:\Path\To\Your\Folder"ReplaceC:\Path\To\Your\Folderwith the actual folder location. - Run the following PowerShell script:
$files = Get-ChildItem -Path "C:\Path\To\Your\Folder" -File $fileMap = @{} foreach ($file in $files) { $name = $file.BaseName $ext = $file.Extension if ($fileMap.ContainsKey($name)) { $fileMap[$name]++ $newName = "$name ($($fileMap[$name]))$ext" } else { $fileMap[$name] = 1 $newName = "$name$ext" } Rename-Item -Path $file.FullName -NewName $newName -ErrorAction SilentlyContinue } - How This Script Works:
- It retrieves all files in the specified folder.
- It checks if a file name already exists.
- If a duplicate is found, it appends a number (
(1),(2), etc.) to the filename. - The
Rename-Itemcommand renames the duplicate files.
- Verify the Results: After running the script, open the folder to check that duplicate files have been renamed automatically.
Conclusion:
Managing duplicate file names efficiently can save time and prevent data loss.
For more tutorial videos, click here .
Subscribe to our YouTube channel for regular updates and interesting videos!
Learn more about Copywhiz.
Download the free trial from here.
Check out our other cool products.
Have a good day.
Thanks for reading till the end :)