Sync Files Between Source and Destination Folders using Robocopy alternative replacement tool

File synchronization is essential for maintaining data consistency, creating backups, and ensuring updated files are available across different locations. Two tools, Copywhiz and Robocopy, can be used for this purpose. Robocopy is a command-line tool included with Windows.

In this blog, we’ll explore how to sync files with each tool through detailed step-by-step guides

Let’s take a look on how to use Copywhiz:

What is Copywhiz?

Copywhiz enhances your file-copy experience by letting you to have more flexibility & control over the file copying and backup process.

Here is how Copywhiz makes file copying a breeze:

  • Copy only new or modified files
  • Easily pick files by name, extension, folder etc from bunch of folders
  • Automatically organize files based on file attributes and metadata
  • Copy files to multiple folders/computers
  • Copy files from multiple folders and paste them at once
  • Sync files between source and destination
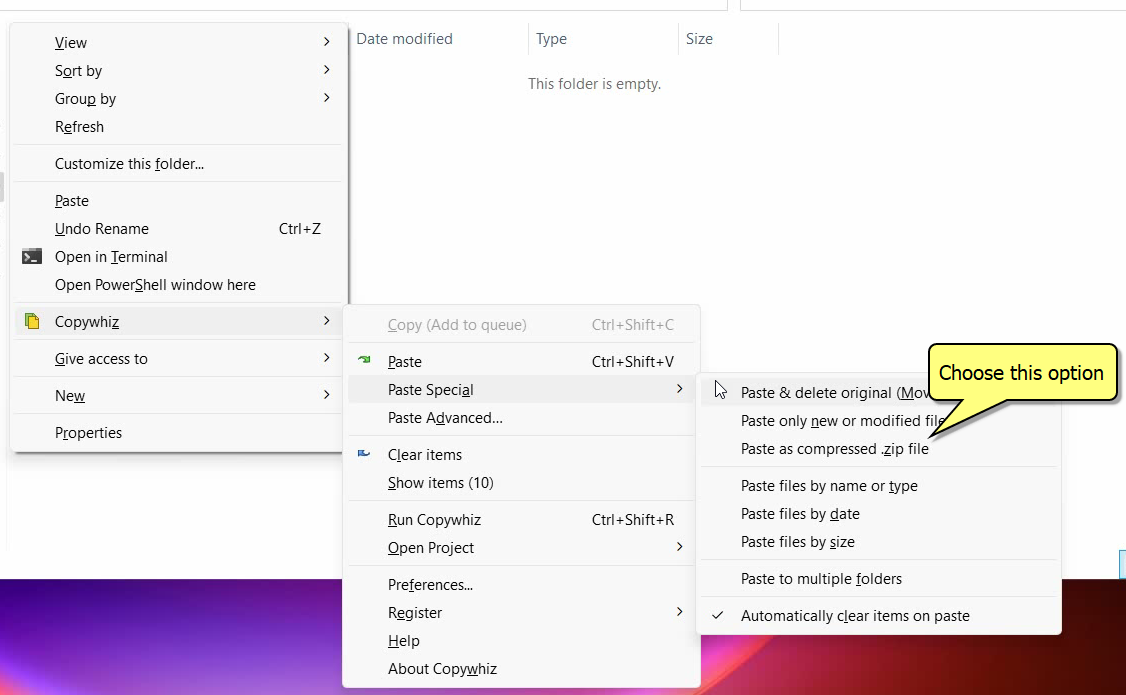
  • Pick files from multiple folders and compress in single .zip file
  • Schedule file backups
  • Verify copied files for data integrity
  • Retain security attributes of files & folders (ownership/user access)
  • Several more hidden nuggets designed to make your file-copy task easier.

Here is a short video for your reference:

Transcription:

1. After you select your files in Copywhiz, go to the destination folder and Choose ‘Copywhiz -> Paste Advanced’.

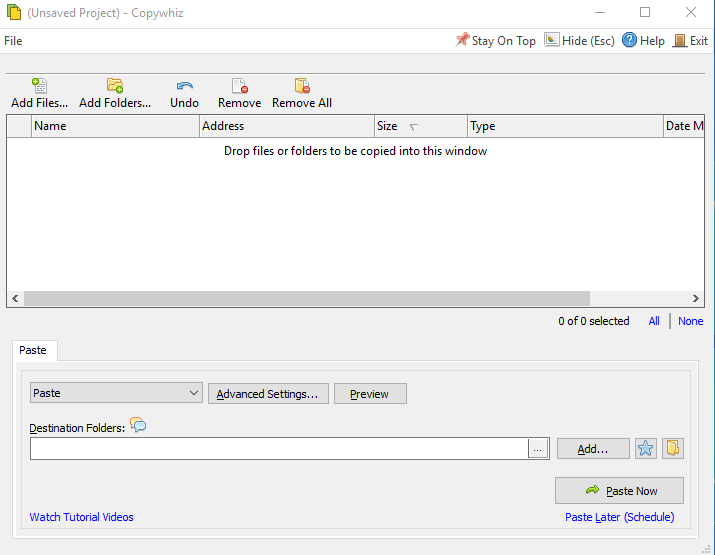
2. The Copywhiz main window will open. Choose the Advanced Settings Tab from there.

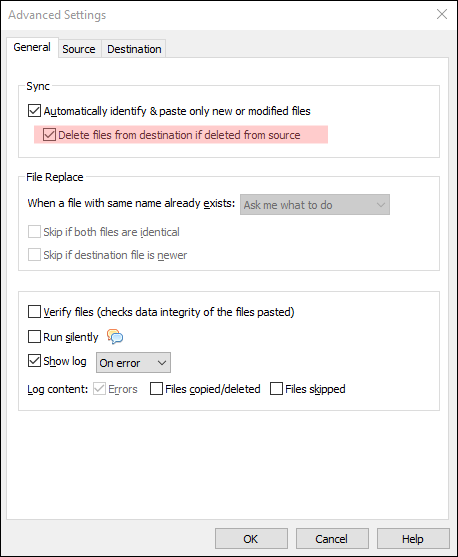
3. Go to the General Tab and choose the option ‘Automatically identify & paste only new or modified files’. After that, select the option ‘Delete files from destination if deleted from source’.

4. Click on OK and proceed with ‘Paste Now’ option. The files will be pasted and the folders will be set to sync.

5. Save the project to run it again in the future.

The next time you make any changes in the source folder, run the saved project file. The folders will sync and the changes will be reflected in the destination folder as well.

We will take a look at how to use Robocopy to sync files between source and destination folder.

Step-by-Step Guide to Using Robocopy

  1. Open Command Prompt or PowerShell
    • Press Win + S, type “cmd” or “PowerShell,” and press Enter.
  2. Basic Sync Command
    Run the following command to synchronize a source folder with a destination folder:cmdCopy codeRobocopy "C:\SourceFolder" "D:\DestinationFolder" /MIR
    • /MIR: Mirrors the source to the destination (adds, updates, and deletes files as needed).
  3. Exclude Files or Folders
    To exclude specific files or folders:cmdCopy codeRobocopy "C:\SourceFolder" "D:\DestinationFolder" /MIR /XF "file.txt" /XD "Temp"
    • /XF: Excludes files by name or extension.
    • /XD: Excludes folders.
  4. Log File Generation
    Create a log file to record synchronization details:cmdCopy codeRobocopy "C:\SourceFolder" "D:\DestinationFolder" /MIR /LOG:"C:\LogFile.txt"
  5. Automate with Task Scheduler
    • Create a .bat file with the Robocopy command.
    • Open Task Scheduler (Win + S, search “Task Scheduler”).
    • Schedule the .bat file to run at desired intervals.

Conclusion

Copywhiz provides simplicity and convenience for everyday tasks.

Learn more about Copywhiz. Download the free trial from here.

For short tutorial videos, Check out this page.

Subscribe to our YouTube channel for interesting videos.

Check out our other cool products.

Have a good day!
Thanks :)

Copy from Multiple Locations to a Single Folder in Windows using an Xcopy alternative replacement tool

When managing files in Windows, there are times when you need to gather files from multiple locations and copy them to a single destination folder. While Windows’ built-in Xcopy command is a powerful utility for file copying, it often lacks user-friendliness and advanced features. That’s where Copywhiz, a versatile and user-friendly tool, shines as a replacement for Xcopy. In this blog, we’ll explore how to use Copywhiz to streamline the process of consolidating files into a single folder.

What is Copywhiz?

Copywhiz enhances your file-copy experience by letting you to have more flexibility & control over the file copying and backup process.

Here is how Copywhiz makes file copying a breeze:

  • Copy only new or modified files
  • Easily pick files by name, extension, folder etc from bunch of folders
  • Automatically organize files based on file attributes and metadata
  • Copy files to multiple folders/computers
  • Copy files from multiple folders and paste them at once
  • Sync files between source and destination
  • Pick files from multiple folders and compress in single .zip file
  • Schedule file backups
  • Verify copied files for data integrity
  • Retain security attributes of files & folders (ownership/user access)
  • Several more hidden nuggets designed to make your file-copy task easier.

Transcription:

To copy files from multiple folders,

  1. Select files using Windows Explorer, right-click on them and choose Copywhiz->Copy from the menu.
  2. Repeat above step to copy files from different folders.
  3. Go to the destination folder, right-click inside the folder and select Copywhiz–>Paste. All the selected files from different folders will be copied successfully.

That’s it in this video.

Advantages of Using Copywhiz

  1. User-Friendly Interface: The graphical interface makes it accessible even for non-technical users.
  2. Selective File Copying: Copywhiz allows you to exclude specific files or include only those that meet certain criteria.
  3. Batch Copying from Multiple Locations: Consolidate files from various folders in one seamless operation.
  4. Task Scheduling: Automate repetitive file copying tasks without requiring scripts or external tools.
  5. Error Handling: Handle duplicate files or conflicts with advanced options like renaming or skipping.

Let’s have a look on how we can use Xcopy:

Xcopy:

Xcopy is a command-line tool included in Windows. While it’s reliable for bulk file copying, it can be intimidating for non-technical users due to its text-based interface and cryptic command syntax. It also has limitations in handling complex scenarios, like selective copying based on specific criteria.

Using Xcopy

  1. Launch Command Prompt: Open the Command Prompt by typing cmd in the Windows search bar and pressing Enter.
  2. Prepare the Command: To copy files from multiple locations, you’ll need to manually specify each source folder. For example: xcopy "C:\Source1\*" "C:\Destination\" /s /y xcopy "C:\Source2\*" "C:\Destination\" /s /y
    • Replace C:\Source1\ and C:\Source2\ with your actual source paths.
    • Replace C:\Destination\ with your target folder path.
    • Options:
      • /s: Copies directories and subdirectories.
      • /y: Suppresses the confirmation prompt for overwriting files.
  3. Execute the Command: Press Enter to execute the command for each source location.
  4. Verify the Result: Check the destination folder to ensure all files have been copied successfully.

Drawbacks:

  • No graphical interface; requires precise syntax.
  • Lacks advanced filtering or preview options.

Conclusion

While Xcopy is a robust tool for copying files, its command-line nature and limited flexibility make it less ideal for complex file management tasks. Copywhiz, on the other hand, provides an intuitive, feature-rich alternative that simplifies the process of consolidating files from multiple locations into a single folder. Whether you’re a casual user or a professional managing large data sets, Copywhiz is a must-have tool for your Windows toolbox.

Try Copywhiz today to experience effortless file copying!

Learn more about Copywhiz.

Download the free trial from here.

For more tutorial videos, click here .

Subscribe to our YouTube channel for regular updates and interesting videos!

Check out our other cool products.

Have a good day.

Thanks for reading till the end :)

Exclude specific folders when copying files in Windows using a Copywhiz

Copying files in Windows while excluding specific folders is a common task for users managing backups, reorganizing data, or transferring selective content. For users seeking a more intuitive and feature-rich experience, Copywhiz is an excellent alternative.

What is Copywhiz?

Copywhiz enhances your file-copy experience by letting you to have more flexibility & control over the file copying and backup process.

Here is how Copywhiz makes file copying a breeze:

  • Copy only new or modified files
  • Easily pick files by name, extension, folder etc from bunch of folders
  • Automatically organize files based on file attributes and metadata
  • Copy files to multiple folders/computers
  • Copy files from multiple folders and paste them at once
  • Sync files between source and destination
  • Pick files from multiple folders and compress in single .zip file
  • Schedule file backups
  • Verify copied files for data integrity
  • Retain security attributes of files & folders (ownership/user access)
  • Several more hidden nuggets designed to make your file-copy task easier.


Video Transcription

1. Select files using Windows Explorer, right-click on them and choose Copywhiz->Copy from the menu as shown below :

2. Go to the destination folder, right-click inside the folder and select Copywhiz–>Paste special–>Paste files by name or type as shown below:

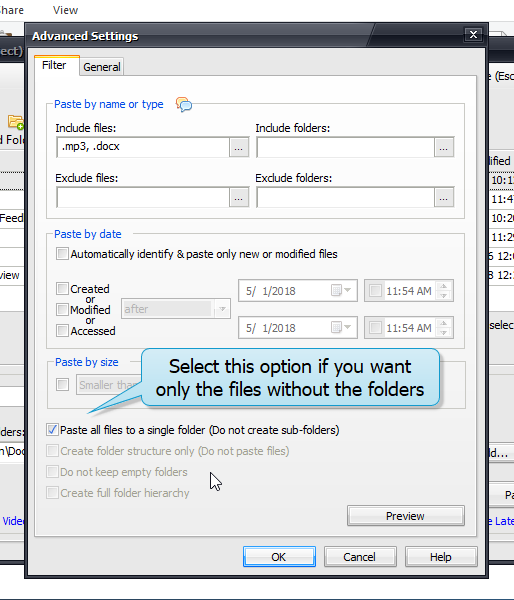
3. The Advanced Settings dialog box will open. You can include or exclude files/folders to be copied by typing their names, file extensions, or folder names. You can also preview the list of files that will be copied and files that will be skipped by clicking on the Preview button. After confirming, press the Ok button in the Advanced Settings dialog box. All the required files will be copied successfully.

Screenshot-Exclude-Files

Conclusion

Copywhiz lets you to choose which type of files to copy & which to ignore i.e, it lets you to do ‘Selective File Copy’.

Pick only those files that are important & avoid files that are not required (Eg. Files that occupy too much space) with Copywhiz. Easily filter files by name, extension, folder, etc. from a bunch of folders.

Complete big file copy tasks with few clicks & save manual effort with Copywhiz.

Thanks for reading till the end :)

Sync Files Between Source and Destination Folders using PowerShell alternative replacement

Syncing files between source and destination folders is a common task, whether for creating backups, maintaining uniformity across systems, or transferring updated data. Copywhiz and PowerShell are two of the tools for this purpose. This guide explores their step-by-step processes

Now let’s look at step by step guide using Copywhiz.

What is Copywhiz?

Copywhiz enhances your file-copy experience by letting you to have more flexibility & control over the file copying and backup process.

Here is how Copywhiz makes file copying a breeze:

  • Copy only new or modified files
  • Easily pick files by name, extension, folder etc from bunch of folders
  • Automatically organize files based on file attributes and metadata
  • Copy files to multiple folders/computers
  • Copy files from multiple folders and paste them at once
  • Sync files between source and destination
  • Pick files from multiple folders and compress in single .zip file
  • Schedule file backups
  • Verify copied files for data integrity
  • Retain security attributes of files & folders (ownership/user access)
  • Several more hidden nuggets designed to make your file-copy task easier.

Here’s a short video on this feature:

Transcription:

1. After you select your files in Copywhiz, go to the destination folder and Choose ‘Copywhiz -> Paste Advanced’.

2. The Copywhiz main window will open. Choose the Advanced Settings Tab from there.

3. Go to the General Tab and choose the option ‘Automatically identify & paste only new or modified files’. After that, select the option ‘Delete files from destination if deleted from source’.

4. Click on OK and proceed with ‘Paste Now’ option. The files will be pasted and the folders will be set to sync.

5. Save the project to run it again in the future.

The next time you make any changes in the source folder, run the saved project file. The folders will sync and the changes will be reflected in the destination folder as well.

We will have a look at step by step guide using PowerShell.


Using PowerShell:

PowerShell is a scripting tool built into Windows, allowing users to automate tasks like file synchronization. Below is a step-by-step guide to syncing files using PowerShell.

Step-by-Step Guide:

  1. Open PowerShell:
    Press Win + S, type “PowerShell,” and open it.
  2. Use the Copy-Item Cmdlet for Basic Copying

To copy all files from SourceFolder to DestinationFolder:
Copy-Item -Path “C:\SourceFolder*” -Destination “D:\DestinationFolder” -Recurse

Add the -Force parameter to overwrite existing files:
powershell
Copy-Item -Path “C:\SourceFolder*” -Destination “D:\DestinationFolder” -Recurse -Force

  1. Use the Robocopy Command for Advanced Syncing
    PowerShell can execute Robocopy, which is better for syncing:
    Robocopy “C:\SourceFolder” “D:\DestinationFolder” /MIR

/MIR: Mirrors the source folder to the destination (adds, updates, and deletes files).
/XF: Excludes specific files.
/XD: Excludes specific directories.

  1. Automate with a PowerShell Script
    Save the script below in a .ps1 file:
    $Source = “C:\SourceFolder”
    $Destination = “D:\DestinationFolder”
    Robocopy $Source $Destination /MIR

Schedule this script using Task Scheduler for automated syncing.


Conclusion

Choose Copywhiz if you prefer simplicity, a graphical interface, or need advanced options like selective file copying and scheduling without delving into scripting.

Learn more about Copywhiz. Download the free trial from here.

For short tutorial videos, Check out this page.

Subscribe to our YouTube channel for interesting videos.

Check out our other cool products.

Have a good day!
Thanks :)

Copy Files to Multiple Folders or Computers in Windows using PowerShell alternative replacement

Copying files to multiple folders or computers can be a time-consuming task, especially when you have a large number of files or directories to manage.

Thankfully, Copywhiz can make the process more efficient compared to PowerShell which requires scripting. In this blog, we’ll compare both approaches and provide a step-by-step guide for using each tool.

Let’s have a look on how we can use Copywhiz for efficiency and ease of use

What is Copywhiz?

Copywhiz enhances your file-copy experience by letting you to have more flexibility & control over the file copying and backup process.

Here is how Copywhiz makes file copying a breeze:

  • Copy only new or modified files
  • Easily pick files by name, extension, folder etc from bunch of folders
  • Automatically organize files based on file attributes and metadata
  • Copy files to multiple folders/computers
  • Copy files from multiple folders and paste them at once
  • Sync files between source and destination
  • Pick files from multiple folders and compress in single .zip file
  • Schedule file backups
  • Verify copied files for data integrity
  • Retain security attributes of files & folders (ownership/user access)
  • Several more hidden nuggets designed to make your file-copy task easier.

Transcription:

  1. Select files using Windows Explorer, right-click on them and choose Copywhiz–>Copy from the menu.
  2. Right-click inside any folder and select Copywhiz–> Paste Advanced.
  3. Copywhiz window will open. You can add multiple folders by clicking on the Add button placed next to the Destination Folders text box. Alternatively, you can simply drag and drop target folders over the Destination Folders text box. When specifying the Destination Folders, you can suffix the name with %date% or %datetime% variables if you wish to have a dated folder name.
  4. Click on Paste Now. Files will now be copied to all the destination folders sequentially.

That’s it in this video.

Let’s have a look on step by step process using PowerShell.

Using PowerShell

PowerShell is a scripting language built into Windows, allowing for automation of various tasks, including file copying.

Step-by-Step Guide

Step 1: Open PowerShell
Press Win + S and search for “PowerShell.”
Right-click “Windows PowerShell” and select “Run as Administrator.”
Step 2: Prepare Your Directories
Ensure the source files are in a single folder.
Create the destination folders if they don’t already exist.
Step 3: Use the Copy-Item Command
The Copy-Item command is the primary tool for copying files.

Example Script

# Define the source file or folder
$Source = "C:\SourceFolder"

# Define the list of destination folders
$Destinations = @(
    "C:\DestinationFolder1",
    "C:\DestinationFolder2",
    "\\RemotePC\SharedFolder" # For network computers
)

# Loop through each destination and copy the files
foreach ($Destination in $Destinations) {
    Copy-Item -Path $Source -Destination $Destination -Recurse -Force
    Write-Output "Files copied to $Destination"
}

Explanation of Parameters

  • -Recurse: Copies all subdirectories and their contents.
  • -Force: Overwrites files if they already exist.
  • Write-Output: Displays a confirmation message.

Step 4: Execute the Script

  1. Copy the script into PowerShell.
  2. Press Enter to run it.
  3. Check the destination folders to confirm the files were copied.

Similarly you can copy files to multiple computers by adding remote destination folders (Network folders/shares).

Conclusion

If you value a user-friendly interface and advanced options like filtering and scheduling, Copywhiz is an ideal choice.

For more tutorial videos, click here .

Subscribe to our YouTube channel for regular updates and interesting videos!

Learn more about Copywhiz.

Download the free trial from here.

Check out our other cool products.

Have a good day.

Thanks for reading till the end :)

Copy from Multiple Locations to a Single Folder in Windows using PowerShell alternative replacement tool

Managing files on Windows often involves copying specific files or folders from multiple directories and consolidating them into one location. Copywhiz offers advanced functionalities to simplify this process compared to PowerShell tool which requires scripting

This blog provides a step-by-step guide to copying files and folders from multiple source directories into a single destination using Copywhiz and PowerShell.

Let’s take a look at step by step process using Copywhiz

What is Copywhiz?

Copywhiz enhances your file-copy experience by letting you to have more flexibility & control over the file copying and backup process.

Here is how Copywhiz makes file copying a breeze:

  • Copy only new or modified files
  • Easily pick files by name, extension, folder etc from bunch of folders
  • Automatically organize files based on file attributes and metadata
  • Copy files to multiple folders/computers
  • Copy files from multiple folders and paste them at once
  • Sync files between source and destination
  • Pick files from multiple folders and compress in single .zip file
  • Schedule file backups
  • Verify copied files for data integrity
  • Retain security attributes of files & folders (ownership/user access)
  • Several more hidden nuggets designed to make your file-copy task easier.

Why Copywhiz?

Copywhiz has a unique feature. It lets you copy files from different folders and paste them all at once in Windows. This feature saves a lot of time and effort. Along with files, you can also pick folders from different locations and paste them all in one shot. This means you can copy, copy, copy, and finally paste altogether.

Transcription:

To copy files from multiple folders,

  1. Select files using Windows Explorer, right-click on them and choose Copywhiz->Copy from the menu.
  2. Repeat above step to copy files from different folders.
  3. Go to the destination folder, right-click inside the folder and select Copywhiz–>Paste. All the selected files from different folders will be copied successfully.

Advantages of Copywhiz

  • User-Friendly: No scripting knowledge required; uses a graphical interface.
  • Advanced Options: Filter files by name, extension, or size and handle duplicates efficiently.
  • Preview Feature: Verify selected files before copying.
  • Retain Folder Hierarchies: Allows you to keep the original directory structure.

Let’s have a look on step by step process using PowerShell.


Method 2: Using PowerShell

PowerShell, a task automation tool, can help automate file and folder copying across multiple locations.

Step-by-Step Guide

  1. Open PowerShell
    • Press Win + X and select Windows PowerShell or search for “PowerShell” in the Start Menu.
  2. Prepare the Directories
    • Identify the source directories containing the files you want to copy.
    • Decide on the destination directory where all the files will be consolidated.
  3. Write the Script

    Use the following PowerShell script: # Define source directories $sourceFolders = @( "C:\SourceFolder1", "C:\SourceFolder2", "C:\SourceFolder3" ) # Define the destination folder $destinationFolder = "C:\DestinationFolder" # Create the destination folder if it doesn't exist if (!(Test-Path -Path $destinationFolder)) { New-Item -ItemType Directory -Path $destinationFolder } # Loop through each source folder and copy files foreach ($folder in $sourceFolders) { Get-ChildItem -Path $folder -File | Copy-Item -Destination $destinationFolder -Force } Write-Output "Files copied successfully to $destinationFolder"
  4. Execute the Script
    • Save the script with a .ps1 extension (e.g., CopyFiles.ps1) and run it in PowerShell.
    • If running scripts is restricted, enable script execution by typing: Set-ExecutionPolicy -Scope Process -ExecutionPolicy Bypass
  5. Verify the Results
    • Navigate to the destination folder and confirm all files have been copied.

Conclusion

Tech-savvy users or those needing complex automation can use PowerShell. However, if you value simplicity, time saving, and advanced features without the need to code, Copywhiz is a superior alternative.

Learn more about Copywhiz.

Download the free trial from here.

For more tutorial videos, click here .

Subscribe to our YouTube channel for regular updates and interesting videos!

Check out our other cool products.

Have a good day.

Thanks for reading till the end :)

Copy files modified in last X days in Windows using a PowerShell alternative replacement

Copying files modified in last X days is a common requirement for backups, file synchronization, and efficient file management. Copywhiz and PowerShell are two such tools. This blog will guide you through both methods.

What is Copywhiz?

Copywhiz enhances your file-copy experience by letting you to have more flexibility & control over the file copying and backup process.

Here is how Copywhiz makes file copying a breeze:

  • Copy only new or modified files
  • Easily pick files by name, extension, folder etc from bunch of folders
  • Automatically organize files based on file attributes and metadata
  • Copy files to multiple folders/computers
  • Copy files from multiple folders and paste them at once
  • Sync files between source and destination
  • Pick files from multiple folders and compress in single .zip file
  • Schedule file backups
  • Verify copied files for data integrity
  • Retain security attributes of files & folders (ownership/user access)
  • Several more hidden nuggets designed to make your file-copy task easier.

An image showing one of Copywhiz’s feature

Using Copywhiz:

Here is a short video that shows how to achieve the above mentioned feature:

Video Transcript:

  1. In this video, we will copy which files were created/modified/accessed in the past X days.
  2. Select the folder, right-click and add it to Copywhiz.
  3. Go to the destination folder, right-click and choose Copywhiz Paste Advanced.
  4. In the Source Tab, go to the ‘Paste by date’ section.
  5. Select the criteria and mention the number of days.
  6. As in the video shown, you can see the preview.
  7. We can mention a date range as well.

Using PowerShell

You can use PowerShell to copy files based on their modification time.

Example:

To copy files modified in the last 7 days:

$source = “C:\path\to\source”
$destination = “C:\path\to\destination”
$days = 7

Get-ChildItem -Path $source -File | Where-Object { $_.LastWriteTime -ge (Get-Date).AddDays(-$days) } | ForEach-Object {Copy-Item $_.FullName -Destination $destination}

Explanation:

Get-ChildItem: Lists all files in the source directory.

Where-Object { $_.LastWriteTime -ge (Get-Date).AddDays(-$days) }: Filters files modified in the last X days.

Copy-Item: Copies the files to the destination folder.


Conclusion

Copywhiz is an advanced, user friendly file copy and backup tool.

Learn more about Copywhiz. Download the free trial from here.

For short tutorial videos, Check out this page.

Subscribe to our YouTube channel for interesting videos.

Check out our other cool products.

Have a good day!
Thanks for reading :)

Schedule file copy for automatic backups using Copywhiz

Hey Guys! In this post we shall learn how to automatically schedule file backups into a new dated folder each time. Using Copywhiz’s scheduling capability, you can back up your data every week, every day, or even every hour.

What is Copywhiz?

Copywhiz enhances your file-copy experience by letting you to have more flexibility & control over the file copying and backup process.

Here is how Copywhiz makes file copying a breeze:

  • Copy only new or modified files
  • Easily pick files by name, extension, folder etc from bunch of folders
  • Automatically organize files based on file attributes and metadata
  • Copy files to multiple folders/computers
  • Copy files from multiple folders and paste them at once
  • Sync files between source and destination
  • Pick files from multiple folders and compress in single .zip file
  • Schedule file backups
  • Verify copied files for data integrity
  • Retain security attributes of files & folders (ownership/user access)
  • Several more hidden nuggets designed to make your file-copy task easier.

Here is a short video that shows how to achieve the above mentioned feature:

Video Transcription:

  1. In this video, we will take automatic file back ups at specific time.
  2. Select the folder, right-click and add it to Copywhiz.
  3. Go to the destination folder, right-click and choose Copywhiz Paste Advanced.
  4. We will add %date% in the destination folder address, to automatically create a new destination folder each time based on the current date, then we will paste now.
  5. To schedule automatic backups of these files, let’s first save them as a Copywhiz project.
  6. To save a copywhiz project, click on the ‘File’ tab and select the ‘Save as’ option.
  7. Name the project and save it.
  8. Select the option “Paste Later” to schedule this project.

Copywhiz will now automatically take backups.

Conclusion

Learn more about Copywhiz. Download the free trial from here.

For short tutorial videos, Check out this page.

Subscribe to our YouTube channel for interesting videos.

Check out our other cool products.

Have a good day!
Thanks for reading :)

Use regular expression to automatically organize files by their name, using Copywhiz

Automatically organize files in separate folders by matching file names based on a regular expression using Copywhiz. This helps you select files based on advance file naming criteria.

Before delving into the steps, let’s learn a bit about Copywhiz.

What is Copywhiz?

Copywhiz enhances your file-copy experience by letting you to have more flexibility & control over the file copying and backup process.

Here is how Copywhiz makes file copying a breeze:

  • Copy only new or modified files
  • Easily pick files by name, extension, folder etc from bunch of folders
  • Automatically organize files based on file attributes and metadata
  • Copy files to multiple folders/computers
  • Copy files from multiple folders and paste them at once
  • Sync files between source and destination
  • Pick files from multiple folders and compress in single .zip file
  • Schedule file backups
  • Verify copied files for data integrity
  • Retain security attributes of files & folders (ownership/user access)
  • Several more hidden nuggets designed to make your file-copy task easier.

Let’s take a look at the below video on how we can achieve the above feature:

Video Transcription:

  1. In this video, we will see how we can use expressions to organize files in seperate folders.
  2. As we see, we have a folder having various employee names. Let’s copy the files and we shall create the folder as per the last name.
  3. Right-click and add it to Copywhiz.
  4. Go to the destination folder, right-click and choose Copywhiz Paste Advanced.
  5. Click on Advanced settings button.
  6. In the destination tab, select organize files inside folders based on name, type, date etc.
  7. Then click on the organizer button and select the criteria to organize the files.
  8. Type the expression and click on Ok and paste now.

Copywhiz has simplified file management and increased productivity.

Conclusion

Learn more about Copywhiz. Download the free trial from here.

For short tutorial videos, Check out this page.

Subscribe to our YouTube channel for interesting videos.

Check out our other cool products.

Have a good day!

Verify data integrity of files copied in Windows using Copywhiz

Verification checks the data integrity of the files copied. This is especially necessary when copying or backing up files over the network or to a removable external drive. With the help of Copywhiz we can ensure the accuracy and reliability of your data.

What is Copywhiz?

Copywhiz enhances your file-copy experience by letting you to have more flexibility & control over the file copying and backup process.

Here is how Copywhiz makes file copying a breeze:

  • Copy only new or modified files
  • Easily pick files by name, extension, folder etc from bunch of folders
  • Automatically organize files based on file attributes and metadata
  • Copy files to multiple folders/computers
  • Copy files from multiple folders and paste them at once
  • Sync files between source and destination
  • Pick files from multiple folders and compress in single .zip file
  • Schedule file backups
  • Verify copied files for data integrity
  • Retain security attributes of files & folders (ownership/user access)
  • Several more hidden nuggets designed to make your file-copy task easier.

Below we have a video describing this feature:

Video Transcription:

  1. As shown in the video, Right click and copy using Copywhiz.
  2. Go to the destination folder, right click and choose Copywhiz Paste Advanced.
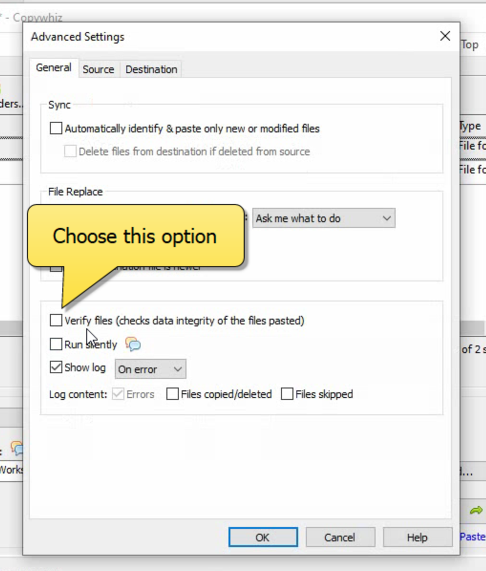
  3. In the General Tab, choose the verify files option.
  4. Click on paste now.

The file verification will be visible in the file copy progress box. This feature ensures your files are safely copied without any errors. Many of you might know this as checksum.

Conclusion

Learn more about Copywhiz. Download the free trial from here.

For short tutorial videos, Check out this page.

Subscribe to our YouTube channel for interesting videos.

Check out our other cool products.

Have a good day!