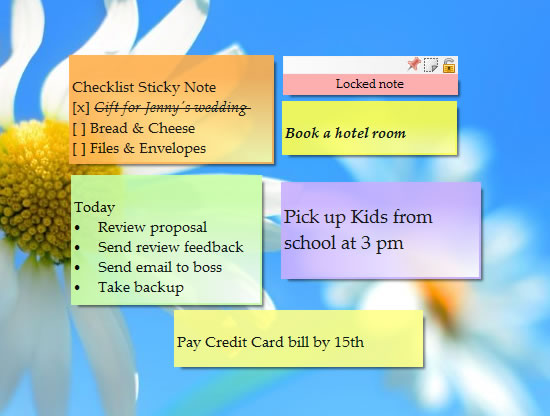
We mainly use sticky notes to jot down our thoughts. We also use them to copy-paste content from the web or many other places. This content may be very lengthy at times. When we have such lengthy sticky notes on our desktop, they make look clustered and come in the way of our other tasks.
A feature to minimize the sticky note and maximize it anytime at our convenience would be the best solution. But how? Most sticky notes software, including the leading Windows sticky notes, do not have any such feature.
We therefore bring to you an alternative software, Notezilla.
Here is a short video showing this feature:
What is Notezilla?
Notezilla is a professional, elegant & highly rated sticky notes app for Windows & Phones (Android, iOS, iPhone, iPad etc). You can also access your sticky notes from a Mac.
Notezilla helps you organize various tiny bits of information you would need through out your life. It keeps all your notes, tasks & reminders handy where ever you are. With sticky notes, you hardly have to put effort to take notes, set reminders, etc. Quickly jot down & move on with your task at hand.
Here are some features of Notezilla:
Sticky notes with reminders
Attach sticky notes to websites, documents, folders & apps
Organize sticky notes inside folders to keep your Windows desktop clean.
Pin sticky notes on top of other apps
Sync sticky notes between Windows, Android, iPhone, iPad
Add pictures inside sticky notes
Checklist sticky notes
Lock sticky notes (password protect)
Markdown support
Send notes over local network (LAN) or across the globe
Notezilla allows you to roll up and down the sticky note. To roll up a sticky note, click on the Roll Up icon in the note toolbar.
To roll down a sticky note, click on the Roll Down icon in the Note Toolbar.
A faster way to roll up/down note is to use the shortcut key Ctrl+O from the note.
Notezilla thus makes your sticky note experience fun and joyful.
And here is another lovely thing. Notezilla has free apps for iPhone, iPad & Android to let you access your sticky notes anytime and anywhere! Install it on your phone from App Store or Google Play Store & sync all your sticky notes with the Windows version of Notezilla.
We all like speed. But it gets annoying when simple tasks like searching for a file or folder on our system take a lot of time and effort out of our important tasks.
This article will tell you how to search for files and folders faster in Windows using RecentX and how it can be used as an alternative to Everything by Voidtools.
What is RecentX?
RecentX is a smart launcher for Windows designed to make your computing life joyful. Here are some of the many cool things you can do with RecentX:
Effortlessly access any file, folder or program on Windows in less than 5 seconds!
Assign tags to frequently used files/folders. Makes things even faster.
Integrates with Windows File open/save window so that you don’t have to navigate any folder when opening or saving a document.
It has a clipboard manager too that remembers all the text & pictures copied to a clipboard so that you can quickly pick & paste them again.
Searching using RecentX compared to Everything (Voidtools)
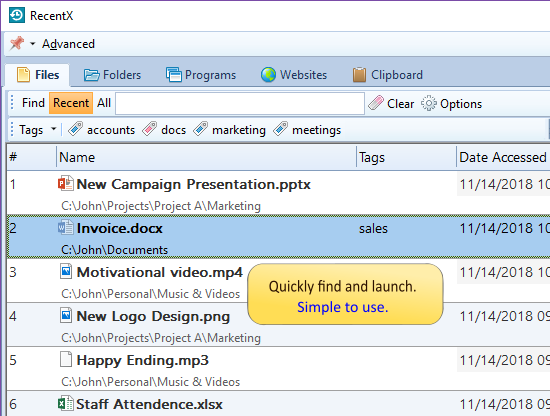
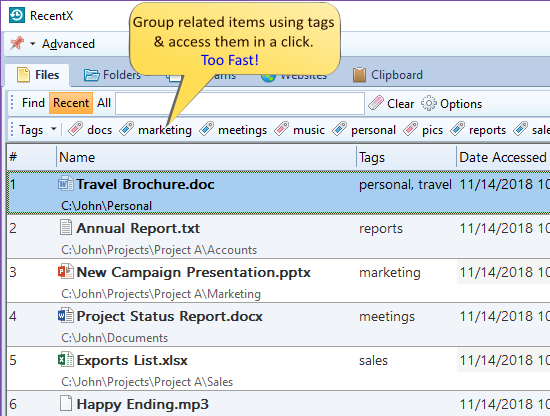
Searching for files: RecentX separates items on the basis of Files, Folders, Programs, Websites and clipboard. This way, the items are not mixed up with each other. This also narrows down the result list since you no longer have to search among unrelated items for the item you want.
Everything, on the other hand, does not separate files and folders and lists down every object in your system initially. There is a filter to only show objects of a particular type, which you can choose to separate these items.
Searching for folders:
Watch a short video on this feature of RecentX:
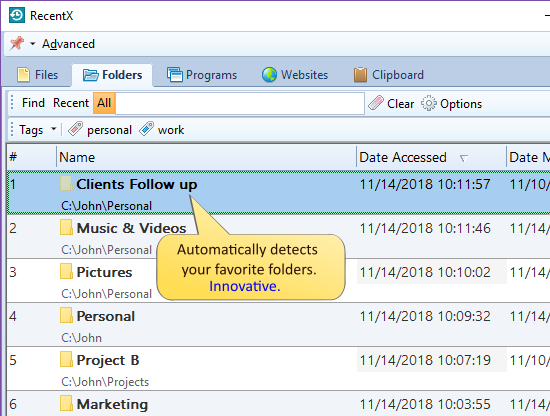
RecentX helps you avoid full folder structure navigation to access subfolders. As mentioned earlier, it separates files and folders. So now, when you want to search for a particular folder, go to the “Folders” Tab of RecentX and type in your search keyword in the text box given below. It will find an item in less than 3 seconds, no matter how deep they are located in your system. Double-click on the desired folder to open it immediately.
Everything has a folder filter. Using this filter, every folder on your system is listed down, and you then have to type the folder you are searching for. The indexing and search offered by Everything is speedy.
Note: With RecentX, you can even add tags to your files and folders for easy access later on. Learn more about this tagging feature from here :
Search in Recent items first
Since we open the same set of files repeatedly, finding only in recently accessed files and folders is more sensible compared to going through the complete hard drive. RecentX does precisely that for you. Items that are recently and frequently accessed are shown before other trivial items, thus making launch easier.
This is possible since RecentX automatically remembers your recently accessed files and folders. So you do not have to spend time configuring it with your favorite items as it is quite hard to keep updating a program with favorite files & folders.
Note: You can also search in all your items instead of just the recent ones.
Everything, on the other hand, has the option to sort items based on Dated Accessed, modified, etc. But sorting the items based on it is really slow, and the long list of items still remains, only that they are now in a different order which doesn’t make much of a difference.
As you can see from the above picture, the search results in RecentX have been narrowed down compared to Everything since we searched only in recent items in RecentX.
RecentX therefore proves an efficient alternative to Everything. The plus point is that there is nothing to learn. It is effortless and also works out of the box. Just install and see it working.
We like to have things our way. It makes us feel powerful and in full control of whatever we are doing. The same should go with your sticky notes. You should have the ultimate choice of how to use them.
Rarely does any sticky note software give you options on how you want their app to behave. This customization is not available even in the leading Windows sticky notes app.
We are here to help. This article will tell you about an alternative software, Notezilla which lets you design your own sticky notes experience.
What is Notezilla?
Notezilla is a professional, elegant & highly rated sticky notes app for Windows & Phones (Android, iOS, iPhone, iPad etc). You can also access your sticky notes from a Mac.
Notezilla helps you organize various tiny bits of information you would need through out your life. It keeps all your notes, tasks & reminders handy where ever you are. With sticky notes, you hardly have to put effort to take notes, set reminders, etc. Quickly jot down & move on with your task at hand.
Here are some features of Notezilla:
Sticky notes with reminders
Attach sticky notes to websites, documents, folders & apps
Organize sticky notes inside folders to keep your Windows desktop clean.
Pin sticky notes on top of other apps
Sync sticky notes between Windows, Android, iPhone, iPad
Add pictures inside sticky notes
Checklist sticky notes
Lock sticky notes (password protect)
Markdown support
Send notes over local network (LAN) or across the globe
Notezilla has four tabs under it’s “Preferences Menu.” These tabs let you change and apply different settings for the software.
To access this menu, right-click on the Notezilla icon next to the clock and choose ‘Preferences’ menu.
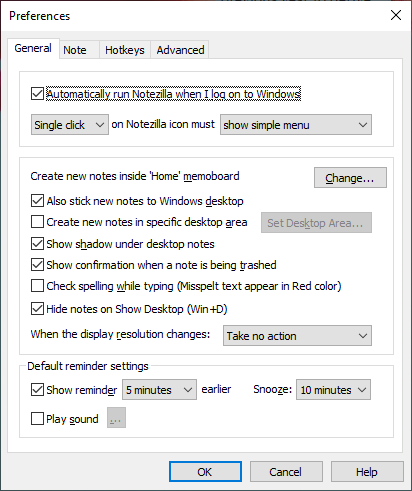
PREFERENCES – GENERAL TAB
This tab provides settings for the general behavior of the app, and it’s regular usage.
Some of the options available are:
Automatically run Notezilla when I log on to Windows
Check this option if you want to start Notezilla automatically, every time you start to log on to your computer.
Show confirmation when a note is being Trashed
Check this option if you want to be prompted with a message box when trashing a note.
Create new notes in specific desktop area
New notes can be created in a specific desktop area. This feature is handy if you are using multiple monitors. Check this option and choose the Set Desktop Area button to specify the desktop area.
Check spelling while typing note
Enable this option if you want to check the spelling while typing inside a note.
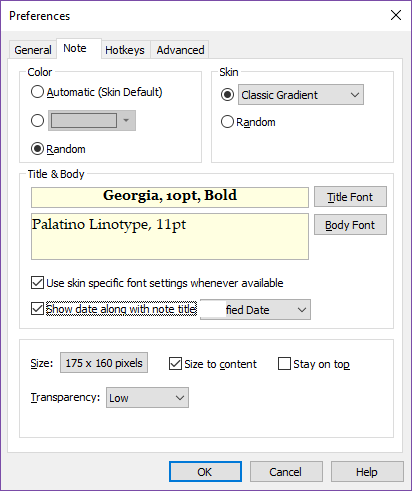
PREFERENCES – NOTE TAB
The Note tab lets you set the default sticky note settings.
Some of the options available are:
Color
Choose the default note color that should be used for new notes. Automatic will use the skin setting. Random will randomly select any color from a set of 16 predefined light colors.
Skin
Choose the default skin that should be used for new notes. Random will randomly select any skin from the currently installed skin.
Title
Choose the default note title, font, font size & font color. Automatically sets the note title to the first sentence that you type inside the note.
Transparency
Set the default transparency level for the new desktop notes
Stay On top
Check this to make the new notes always stay on top, by default.
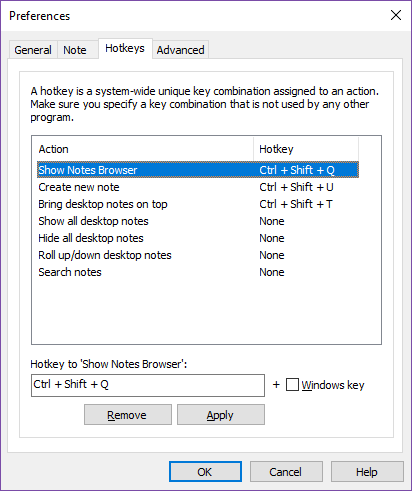
PREFERENCES – HOTKEYS TAB
A hotkey is a system-wide unique key combination assigned to an action. Make sure you specify a key combination that is not used by any other program.
Setting a Hotkey
To set a hotkey, select an action from the list, specify the key combination in the edit box below the list, and choose the Apply button.
Removing a Hotkey
To remove a hotkey, select an action from the list, press backspace key in the edit box below the list so that the edit box shows ‘None’ and choose Remove button.
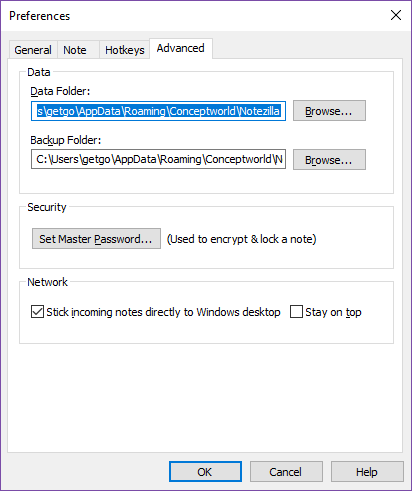
PREFERENCES – ADVANCED TAB
This tab lets you set advanced settings of the app related to backup, restore, and master password.
Data Folder
This folder is the location where Notezilla stores all the notes data. Choose the Browse button to change this location. You will need to exit and relaunch Notezilla to apply this setting.
Backup Folder
Notezilla keeps five backup copies of its data under this folder, date-wise. Choose the Browse button to change this location. Notezilla takes the backup, every time it launches.
Set Master Password
Choose this button to set the single master password used to lock/unlock notes and memoboards.
Conclusion
Notezilla is really helpful to increase your work productivity by letting you work without disturbance.
It thus saves a lot of your time and effort. Notezilla also has free apps for iPhone, iPad & Android to let you access your sticky notes anytime and anywhere! Install it on your phone from App Store or Google Play Store & sync all your sticky notes with the Windows version of Notezilla.
This post will highlight the ways in which you can work with files and folders easily in Windows by comparing the functions of Everything by Voidtools and an alternative, RecentX.
What is RecentX?
RecentX is a smart launcher for Windows designed to make your computing life joyful. Here are some of the many cool things you can do with RecentX:
Effortlessly access any file, folder or program on Windows in less than 5 seconds!
Assign tags to frequently used files/folders. Makes things even faster.
Integrates with Windows File open/save window so that you don’t have to navigate any folder when opening or saving a document.
It has a clipboard manager too that remembers all the text & pictures copied to a clipboard so that you can quickly pick & paste them again.
Let’s see how to achieve this.
Select a file faster in the file open/save window
The file open/save dialog window that is shown by all Windows applications is very tedious to use. RecentX makes it very easy to select any file in this window. When the file open/save window opens, find & choose the file using RecentX. The file name will be automatically displayed in the File Open/Save window, after which you need to click on “Open.” That’s it.
Everything: This function is not available in Everything by Voidtools. You can easily copy or move an item from one place to another but not open or save them from within the program itself.
Quickly access files and folders by tagging them
RecentX lets you tag any file or folder in Windows. Tagging files help you to access a group of files/folders etc. in a few seconds, however deep they are in your system. This feature can save a lot of time. You can also send standard email replies to your clients by tagging clipboard items.
Everything: It does not have a tagging feature, but it does have a filter feature to sort items according to their type.
To learn about the RecentX tagging feature in detail, check out the following blog post:
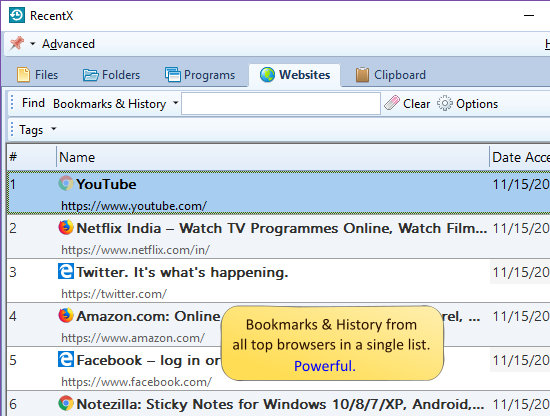
Search and access website history & bookmarks of all major browsers
We usually don’t remember which website we browsed to find a particular content. RecentX serves as a log that you can access to check which websites you browsed so that you can re-visit them quickly. It doesn’t matter how long it’s been since you accessed the site. You can find it even after 1 month or 3 months or 6 months using RecentX.
RecentX lets you access website history & bookmarks from major browsers like Google Chrome, Mozilla Firefox, Microsoft Edge, etc. on Windows.
Tip: To find and launch a website faster, you can even create and use tags.
Everything: With this, you can add a list of files as a bookmark to access the same files easily for future use. However, you cannot search or access website history from browsers.
This short video will give you more clarity on this:
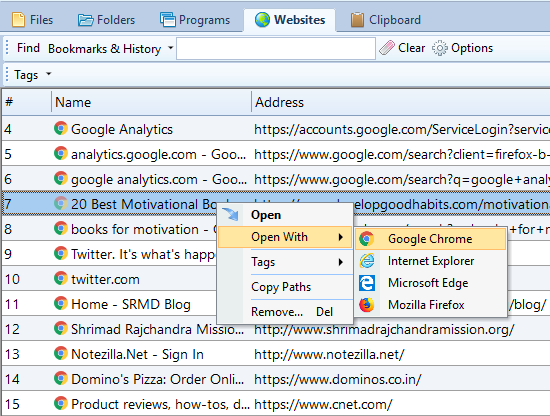
Open a website in any browser
Since RecentX shows websites & bookmarks from all major browsers, you can also open them in any browser of your choice – Google Chrome, Mozilla Firefox, Microsoft Edge, Microsoft Internet Explorer, etc. The “Open With” option lets you open any web page in any installed browser.
Useful for testing the same website in multiple Internet browsers. It comes handy when some sites work only in a particular Internet browser.
Everything: This is again not possible to do with Everything.
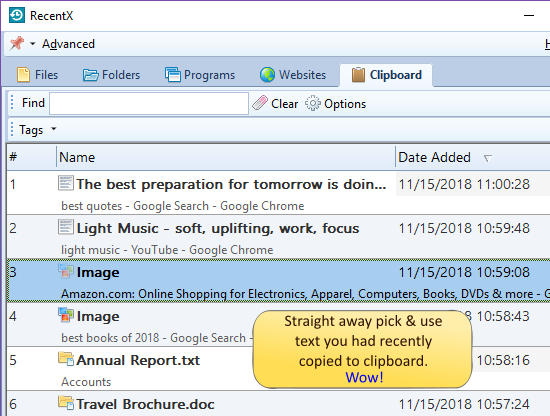
Conveniently access clipboard history
RecentX remembers all the text & images that you copy to the clipboard. It keeps track of items as old as six months to a year and as new as something copied an hour back or a day back. Just pick them directly from RecentX when needed, instead of copy-pasting the same things repeatedly. This is simple and a real time saver. What more? You can even tag the clipboard history items to access them faster the next time.
Watch this short video to find out what more you can do with the Clipboard History Manager:
Everything: This function is not available in Everything.
Thus RecentX proves very efficient, productive and easy at the same time.
This article will tell you how to easily access files and folders by tagging them in Windows using RecentX and Everything by Voidtools.
Why tag files and folders?
We often find ourselves opening the same files and folders again and again for our work. Therefore easy and fast access to these files and folders is essential for work productivity. Setting up a tagging system is, therefore, a good idea.
A tag is generally a keyword or a term that you assign to a piece of information like your files, folders, images, etc. This helps you easily organize your files and folders and helps you avoid multi-folder navigation, especially when your folder structure is so complex that it takes a lot of time to find files.
What is RecentX?
RecentX is a smart launcher for Windows designed to make your computing life joyful. Here are some of the many cool things you can do with RecentX:
Effortlessly access any file, folder or program on Windows in less than 5 seconds!
Assign tags to frequently used files/folders. Makes things even faster.
Integrates with Windows File open/save window so that you don’t have to navigate any folder when opening or saving a document.
It has a clipboard manager too that remembers all the text & pictures copied to a clipboard so that you can quickly pick & paste them again.
Everything (Voidtools)
Everything has a “Filters” feature. Using this, you can separate items based on their type like document, folder, video, audio, pictures, etc. and only view files of a particular type according to the selected filter. For example, when you select the “audio” filter, all the audio files on your system are listed down. You can then search and access your file from this list.
RecentX
Watch a short video perfectly depicting this feature:
RecentX enables you to find files and folders in a more meaningful way by letting you tag them. These tags let you categorize files, folders, apps & websites based on categories, file types, projects, etc. for easy access in the future. You can even add multiple tags to a particular item.
These tags can be of two types:
Regular tags
Smart tags
Regular Tags
Tags assigned to specific files are Regular Tags.
Say, you have a file, “Orders”, which you update every day. You don’t have to go to the file location repeatedly to access it. Just tag the file as anything you want. Ex: docs, important, etc. So the next time you want to open it, type the tag in the RecentX search window, and a list of all files with the mentioned tag will appear. Just a single click and your file opens instantly. This is easy since you can enable search only in “Recent” items instead of all files and folders, thereby narrowing down the file list.
All your tags show up on top in the tag toolbar so that you don’t even have to search for the tags. This is also helpful when you have lots of tags, and you don’t remember what tag you had assigned to a particular file.
Regular tags are in blue.
How do i add a regular tag?
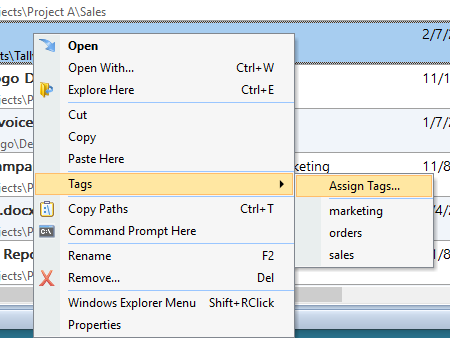
This is very simple. Right-click on the item you want to tag and select “Tag” from the options.
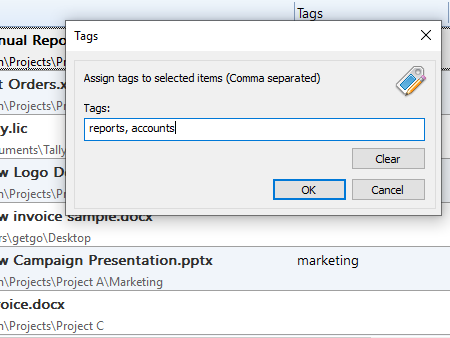
A “Tag” Window will open where you can type in your tag(s).
Note: If you want to add multiple tags, separate them with a comma (,).
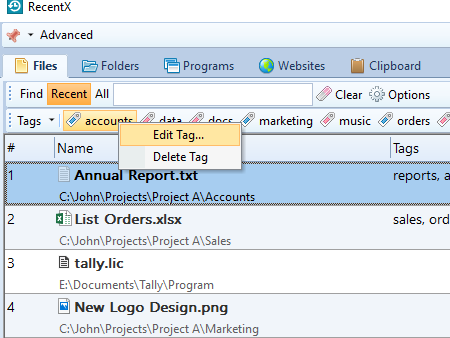
Can i edit my tag later?
Yes. Editing tags is as easy as adding tags. Right-click on the tag name in the tags toolbar and edit the tag.
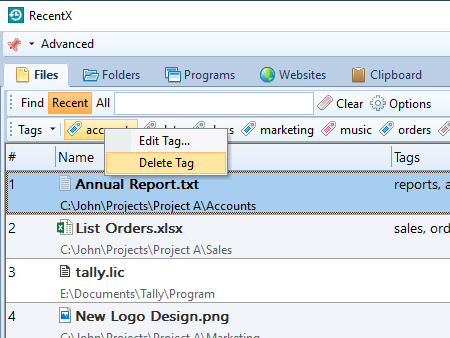
Is it possible to delete a tag?
When you no longer need a particular tag, delete it by selecting it from the tags toolbar on top.
Smart Tags
Tags assigned to a specific type of files or folders (based on keywords) are Smart Tags.
Smart Tags in RecentX let you save keywords that you frequently use to search your regularly accessed files and folders. Ex: “pdfs” for your PDF files and “docs” for your word documents. Typically, if you would type .doc, all the files having .doc in their name would be listed down. But when you click on the docs tag, only files given this tag are listed, so you don’t have to scroll through a long list of files. This is similar to the filter feature of “Everything” listed above.
These smart tags are listed in the tags toolbar in Red color.
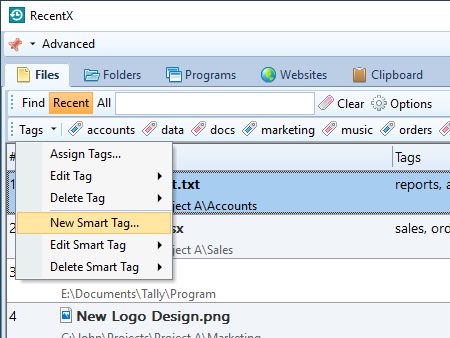
How do i add a smart tag?
Click on the Tags button located on the top left of your RecentX window. Select the option “New Smart Tag”. Type in the tag name(s) and the keyword(s) for the tag in the smart tag window that opens.
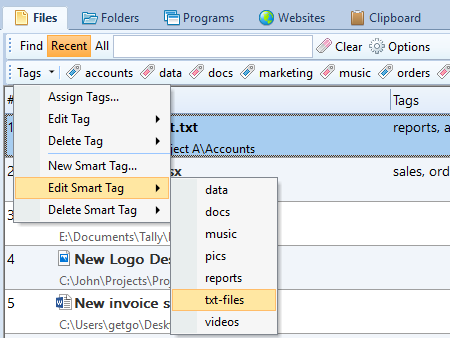
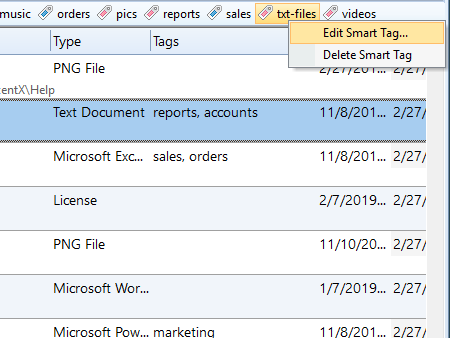
How do i edit this tag later?
Editing smart tags is the same as editing regular tags. Click on the Tags button on the top left of the RecentX window, click on the Edit Tag option and select the tag that needs to be edited from the menu.
Or you can just right-click on the Smart tag name directly from the tags toolbar and edit it too.
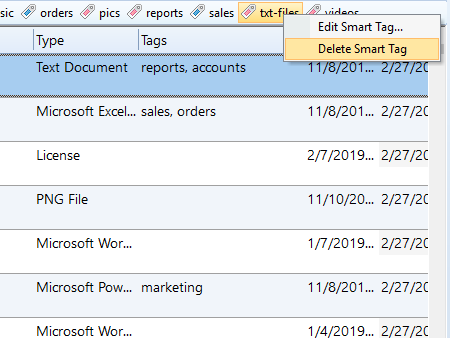
Can smart tags be deleted too?
Yes. Deleting smart tags is easy, just like regular tags. Right-click on the tag name directly from the tags toolbar and delete it.
RecentX therefore comes very handy if you access the same set of folders each day for a particular project. Not only is this fast but also easy and fun. This feature is rarely available in any other file launching program.
Learn more about how RecentX can increase your work productivity from here.
Notezilla is a professional, elegant & highly rated sticky notes app for Windows & Phones (Android, iOS, iPhone, iPad etc). You can also access your sticky notes from a Mac.
Notezilla helps you organize various tiny bits of information you would need through out your life. It keeps all your notes, tasks & reminders handy where ever you are. With sticky notes, you hardly have to put effort to take notes, set reminders, etc. Quickly jot down & move on with your task at hand.
Here are some features of Notezilla:
Sticky notes with reminders
Attach sticky notes to websites, documents, folders & apps
Organize sticky notes inside folders to keep your Windows desktop clean.
Pin sticky notes on top of other apps
Sync sticky notes between Windows, Android, iPhone, iPad
Add pictures inside sticky notes
Checklist sticky notes
Lock sticky notes (password protect)
Markdown support
Send notes over local network (LAN) or across the globe
Tag sticky notes
Fully transparent sticky notes
Dark mode
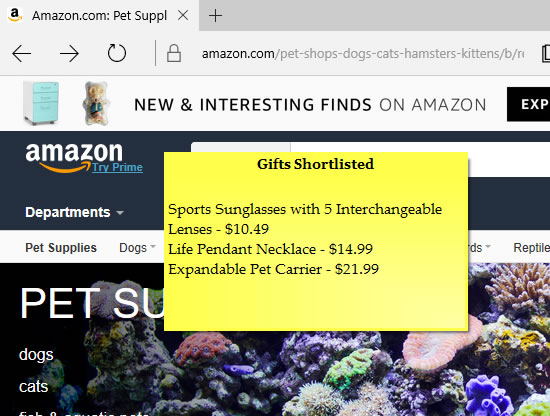
An image showing one of the features of Notezilla.
Windows uses the Segoe Print font. Changing the default font is currently not supported in Sticky Notes. You will have to type your text in the desired font in a text editor like Word, and copy-paste it in your sticky note. This might help you get the font you want.
But this is an unneeded task. Why waste time doing this when you can directly format text from within the note itself in Notezilla.
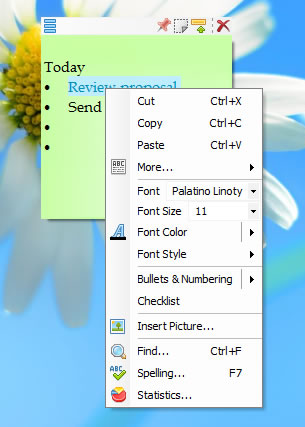
Text formatting in Notezilla
Here is a short video perfectly depicting this feature:
Notezilla provides varied options to edit a sticky note. It supports text formatting features like :
and lots more. There are also shortcut keys available for faster formatting.
Notezilla thus makes your sticky note experience really productive. And guess what? Notezilla also has free apps for iPhone, iPad & Android to let you access your sticky notes anytime and anywhere! Install it on your phone from App Store or Google Play Store & sync all your sticky notes with the Windows version of Notezilla.
We often store important information in our sticky notes. Losing the data due to any reason say upgrade or while trying to import from other software is thus a significant threat. What is required is a secure method to back up the data and safely restore it anytime. And what about moving them to another system? This is an important feature too.
With the recent updates in Windows sticky notes, we surely are happy with the new sync feature and dark theme. It will make our experience better for sure. But taking backups and restoring is still tedious and time-consuming.
We therefore present to you an alternative software, Notezilla which will take multiple backups for you and restore all your sticky notes back from the cloud.
What is Notezilla?
Notezilla is a professional, elegant & highly rated sticky notes app for Windows & Phones (Android, iOS, iPhone, iPad etc). You can also access your sticky notes from a Mac.
Notezilla helps you organize various tiny bits of information you would need through out your life. It keeps all your notes, tasks & reminders handy where ever you are. With sticky notes, you hardly have to put effort to take notes, set reminders, etc. Quickly jot down & move on with your task at hand.
Here are some features of Notezilla:
Sticky notes with reminders
Attach sticky notes to websites, documents, folders & apps
Organize sticky notes inside folders to keep your Windows desktop clean.
Pin sticky notes on top of other apps
Sync sticky notes between Windows, Android, iPhone, iPad
Add pictures inside sticky notes
Checklist sticky notes
Lock sticky notes (password protect)
Markdown support
Send notes over local network (LAN) or across the globe
Tag sticky notes
Fully transparent sticky notes
Dark mode
An image showing one of the features of Notezilla.
Here is a short video perfectly depicting this feature:
Notezilla keeps 5 backups of your notes data in a separate backup folder. You can even change this backup folder to another location or use your own backup tool.
Restore from Notezilla’s backup folder
Follow the steps below to restore your notes from Notezilla’s backup folder:
1. Open both data & backup folders in Windows Explorer.
2. Exit Notezilla.
3. Inside the backup folder, you would notice different dated folders (e.g., Backup\2019-01-12). Open a dated folder that you think would contain your latest & best notes data.
4. Copy Notes8.db file (& other files) from that folder to the data folder. Replace/rename duplicate files.
5. Run Notezilla.
Restore from your own backup location
Follow the steps below:
1. Open the data folder in Windows Explorer.
2. Exit Notezilla.
3. From your backup location, copy Notes8.db file (& other files) to the data folder. Replace/rename duplicate files.
4. Run Notezilla.
Moving your sticky notes to another computer
Old Computer
On the old computer, copy all the files from the data folder to a removable drive (pen drive, external hard drive, etc.) Know where Notezilla stores its notes data.
You may also want to copy all the skin files. Skins are stored under %AppData%\Conceptworld\Notezilla\Skins folder. Just copy this address & open it in Windows Explorer. Copy all *.nsz files so that you can import them on the new computer.
New Computer
1. Download & install Notezilla on the new computer.
2. Know where Notezilla stores its notes data & open that data folder in Windows Explorer.
3. Exit Notezilla.
4. Copy Notes8.db (& other files) from your removable drive to the data folder. Replace/rename duplicate files.
5. (Optional step) Copy all skin files (*.nsz) to %AppData%\Conceptworld\Notezilla\Skins folder. Replace/rename duplicate files.
6. Run Notezilla.
Conclusion
Notezilla thus ensures that all your data is safely stored in the cloud and can be retrieved in case of any untoward incident.
Note: The contents of your notes are totally safe in the cloud, and we do not have any kind of access to them.
Notezilla thus saves a lot of your time and efforts. Notezilla also has free apps for iPhone, iPad & Android to let you access your sticky notes anytime and anywhere! Install it on your phone from App Store or Google Play Store & sync all your sticky notes with the Windows version of Notezilla.
Apart from the normal and advanced file copy features, Copywhiz offers some special features you would really appreciate. It lets you retry or skip files on error, run Copywhiz silently in the background, show error logs, and lot more.
But you might not know that Copywhiz also lets you run a project from the command line. This post will explain more about this feature.
What is Copywhiz?
Copywhiz enhances your file-copy experience by letting you to have more flexibility & control over the file copying and backup process.
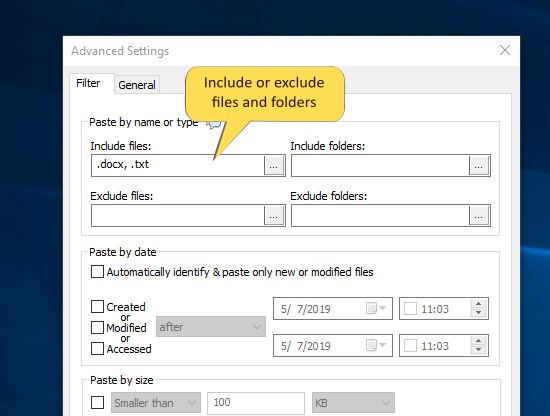
An image depicting one of the features of Copywhiz
Steps to exclude and delete specific folders
Note: Copywhiz allows you to copy/move files based on size. So here, we will move folders to another location based on their names to another temporary location. This will delete the folders from the source location. After which you can delete the temporary location. That’s all.
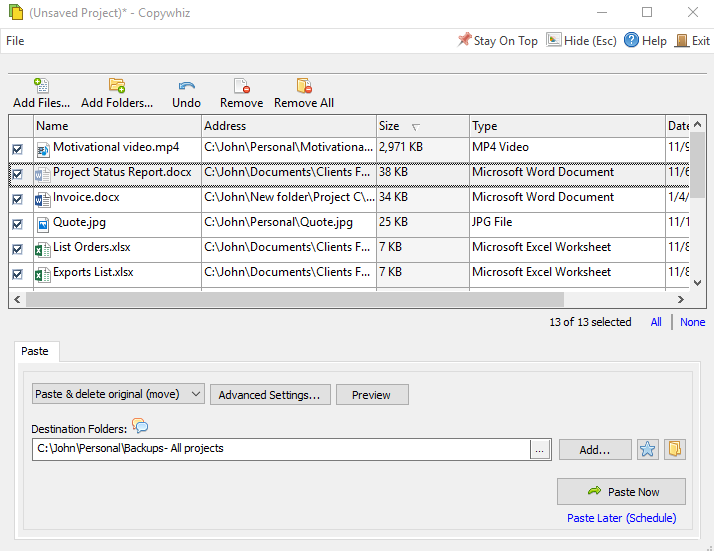
1. Select the source folders from which certain sub-folders need to be deleted. To select, choose Copywhiz–>Copy from the menu as shown below:
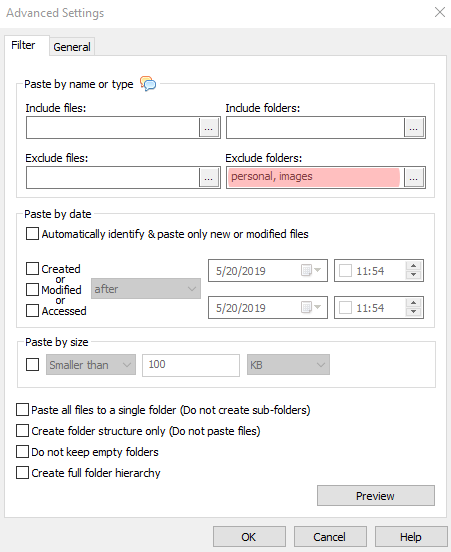
2. Go to the destination folder, right-click and select Copywhiz–>Paste Advanced. The advanced settings dialogue box will open.
3. Include folders to be moved by typing name, as shown in the below picture. You can also preview the list of files that will be copied and those that will be skipped by clicking on the ‘Preview’ button. After confirming, press the ‘OK’ button.
4. Back in the Copywhiz main window, select the option “Paste and delete original (move)” and then click on the “Paste Now” button. All the included folders will be moved successfully. After which you can delete the destination folder because our goal was to delete the folders from the source.
Conclusion
Copywhiz thereby enhances your file copy experience in Windows. It lets you perform Selective File Copy by offering more flexibility when copying files & folders by letting you choose which type to copy & which to ignore. An additional feature is the ability to schedule automatic file backups.
One thing you will experience on using Copywhiz is speed. Copywhiz performs all the tasks within a few seconds, which makes it ideal for every type of work environment.
This post will tell you how to copy files even faster using keyboard shortcuts for Copywhiz.
Why shortcuts?
The normal way to copy files is: Right-click -> go to Copywhiz -> find the copy option and click copy.
This is fine for a few files and folders. But when you have a lot of files to copy, this will consume a lot of your time and effort. This is where using keyboard shortcuts of Copywhiz is a smart move.
What is Copywhiz?
Copywhiz enhances your file-copy experience by letting you to have more flexibility & control over the file copying and backup process.
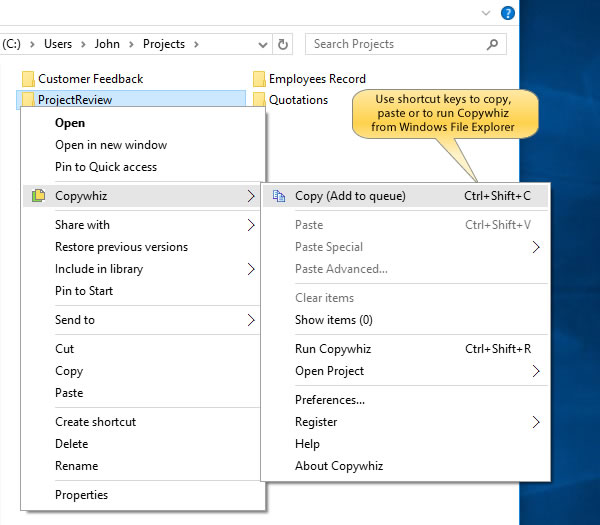
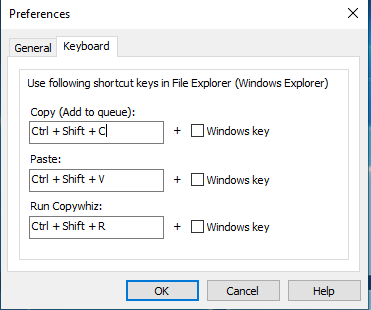
Copywhiz has shortcut keys to copy files, paste files and run Copywhiz. To copy files, the shortcut key is: Ctrl+Shift+C To paste files, the shortcut key is: Ctrl+Shift+V To run the Copywhiz program, the shortcut key is: Ctrl+Shift+R
Changing the default Shortcut keys
You can configure your shortcut keys from the “Keyboard Tab” under the Copywhiz ‘Preferences’. To access this ‘Preferences Menu,’ launch Copywhiz program and click on File -> Preferences menu. Add your own shortcut keys for your convenience or to even ensure that they do not clash with shortcuts of any other program/app you use.
Note: After you change the shortcut keys, make sure you close and open File Explorer again for the changes to be saved.
Conclusion
Copywhiz thus is helpful to copy large set of files within a few moments. This is very useful when you are working on projects having hundreds of files. It thus takes care of your minutest need to increase work productivity. And what more? You can also schedule automatic file backups and take incremental backups using Copywhiz.