Copy only changed (new and modified) files in Windows using Copywhiz

Hello Friends!

This video will teach you how to copy only new and modified files in Windows using Copywhiz.

What is Copywhiz?

Copywhiz enhances your file-copy experience by letting you to have more flexibility & control over the file copying and backup process.

Here is how Copywhiz makes file copying a breeze:

  • Copy only new or modified files
  • Easily pick files by name, extension, folder etc from bunch of folders
  • Automatically organize files based on file attributes and metadata
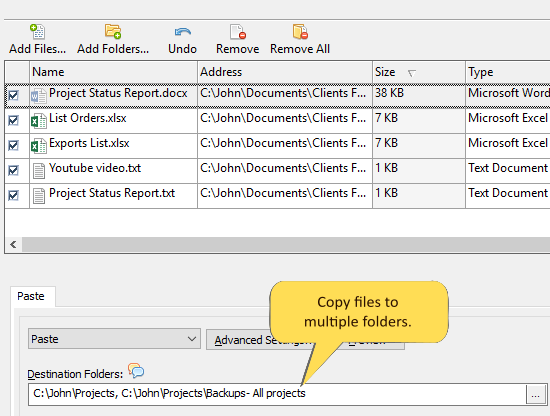
  • Copy files to multiple folders/computers
  • Copy files from multiple folders and paste them at once
  • Sync files between source and destination
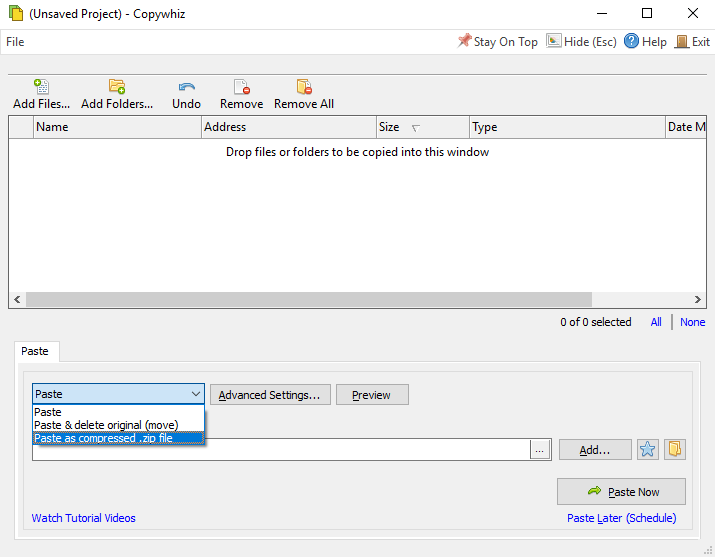
  • Pick files from multiple folders and compress in single .zip file
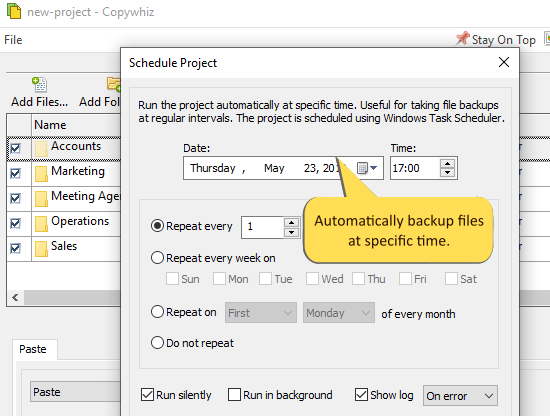
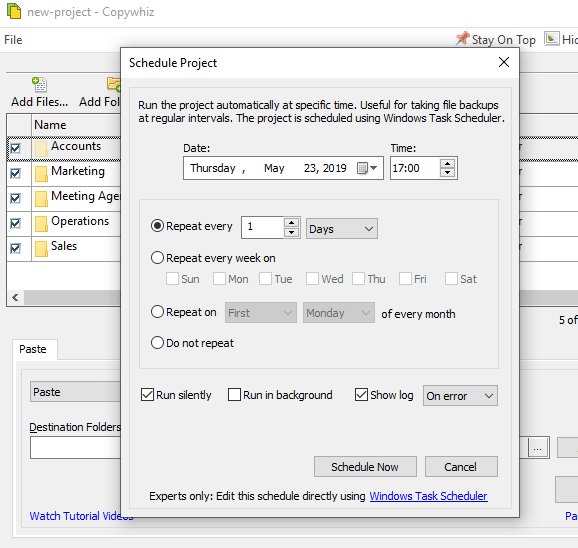
  • Schedule file backups
  • Verify copied files for data integrity
  • Retain security attributes of files & folders (ownership/user access)
  • Several more hidden nuggets designed to make your file-copy task easier.

Why Copywhiz?

Copywhiz can copy only files that are newly added or recently modified. Copywhiz automatically detects new & changed files making the whole process very quick. Alternatively, you can copy files based on specific dates (date modified, date created, date accessed) also. What could take several hours if done manually, Copywhiz completes it in few seconds. Saves your time exponentially.

Transcription:

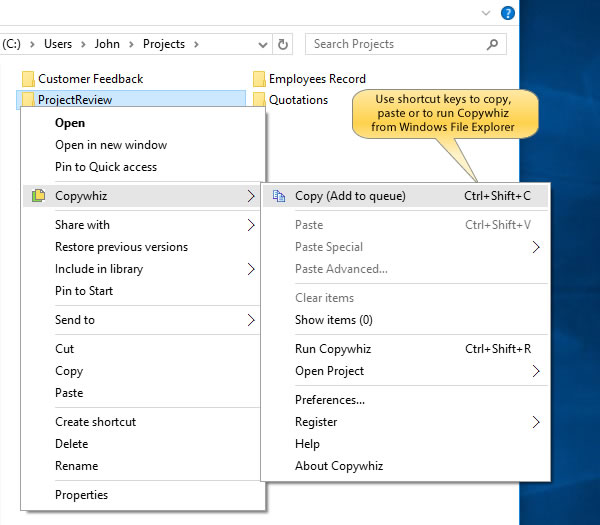
  1. Right-click on the folder from which only new or modified files need to be copied and choose Copywhiz–>Copy from the menu.
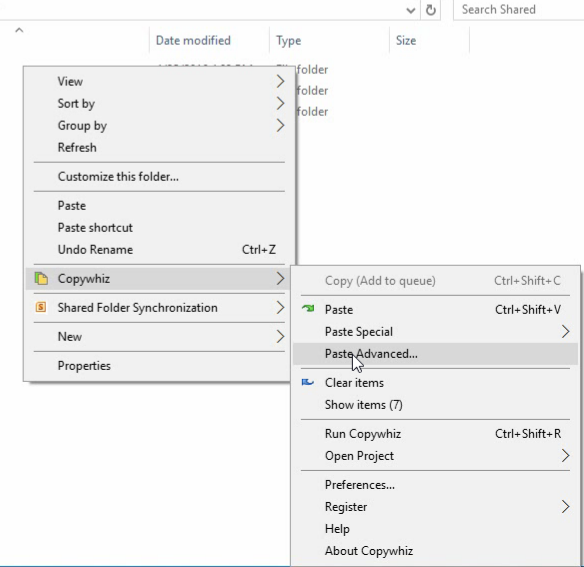
  2. Go to the destination folder, right-click on it and select Copywhiz–>Paste Special- ->Paste only new & modified files
  3. If the same folder already exists in the destination, then only new or modified files will be replaced, others will be skipped, saving a lot of time.

That’s it in this video.

For more tutorial videos, check out this page.

Subscribe to our YouTube channel for interesting videos.

Learn more about Copywhiz. Download the free trial from here.

Have a good day.

Thanks for your time :)

Auto-rename files having duplicate names in Windows using Copywhiz

Encountering errors pop-ups stating that a file with the same name already exists, is dreaded by all. We can try checking for a duplicate file before the file copy if the number of files is less. But this is not practically possible to do for multiple files or copying files from various folders.

We, therefore, bring you a solution for this. Software that will automatically rename duplicate files for you!

And that software is a file copy & backup software called Copywhiz.

What is Copywhiz?

Copywhiz enhances your file-copy experience by letting you to have more flexibility & control over the file copying and backup process.

Here is how Copywhiz makes file copying a breeze:

  • Copy only new or modified files
  • Easily pick files by name, extension, folder etc from bunch of folders
  • Automatically organize files based on file attributes and metadata
  • Copy files to multiple folders/computers
  • Copy files from multiple folders and paste them at once
  • Sync files between source and destination
  • Pick files from multiple folders and compress in single .zip file
  • Schedule file backups
  • Verify copied files for data integrity
  • Retain security attributes of files & folders (ownership/user access)
  • Several more hidden nuggets designed to make your file-copy task easier.

Why Copywhiz?

When copying files, you may encounter another file with the same name but different content. Often happens with music & picture files. You may not want to replace the existing file with the new one but keep both the files. Copywhiz lets you automatically rename the existing file before copying the new file so that you can keep both the files.

Here is a short video depicting the steps:

Transcription:

  1. Select files using Windows Explorer, right-click on them and choose Copywhiz->Copy from the menu.
  2. Go to the destination folder, select Copywhiz–>Paste from the menu.
  3. While copying, if files with duplicate names exist, the ‘File Already Exists’ dialog box will appear which will show the details of the duplicate files.
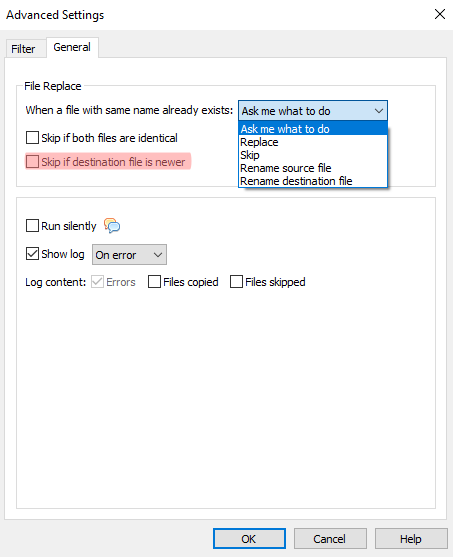
  4. Click on the Advanced button placed in the bottom-left of the ‘File Already Exists’ dialog box. Tick the option to rename the destination file with a suffix instead of overwriting it. You can apply the suffix to all duplicate files by enabling the option Do this for all files. And finally click on Rename button. Once the files are copied, you will see duplicate files renamed successfully.

That’s it in this video.

The biggest advantage of using Copywhiz is that you can take automatic backups of your files and folders! Read more about it here:

Learn more about Copywhiz.

Download the free trial from here.

For more tutorial videos, click here .

Subscribe to our YouTube channel for regular updates and interesting videos!

Check out our other cool products.

Have a good day.

Thanks for visiting our blog :)

Copy only specific type of files or folders in Windows using Copywhiz

Hello Friends!

Watch the below video to know how to copy only specific type of files in Windows using Copywhiz.

What is Copywhiz?

Copywhiz enhances your file-copy experience by letting you to have more flexibility & control over the file copying and backup process.

Here is how Copywhiz makes file copying a breeze:

  • Copy only new or modified files
  • Easily pick files by name, extension, folder etc from bunch of folders
  • Automatically organize files based on file attributes and metadata
  • Copy files to multiple folders/computers
  • Copy files from multiple folders and paste them at once
  • Sync files between source and destination
  • Pick files from multiple folders and compress in single .zip file
  • Schedule file backups
  • Verify copied files for data integrity
  • Retain security attributes of files & folders (ownership/user access)
  • Several more hidden nuggets designed to make your file-copy task easier.

Why Copywhiz?

When copying files using Copywhiz, you can exclude or include specific types of files/folders. You gain more control over what to copy. You can easily filter files being copied by file name, file extension, or directory name.

Transcription:

  1. Select files using Windows Explorer, right-click on them and choose Copywhiz->Copy from the menu.
  2. Go to the destination folder, right-click inside the folder and select Copywhiz–>Paste special–>Paste only files of specific types.
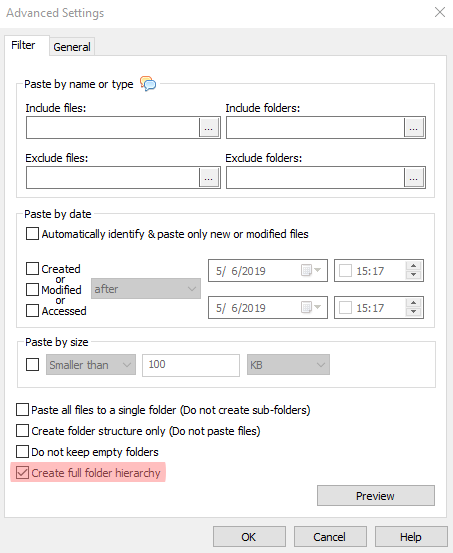
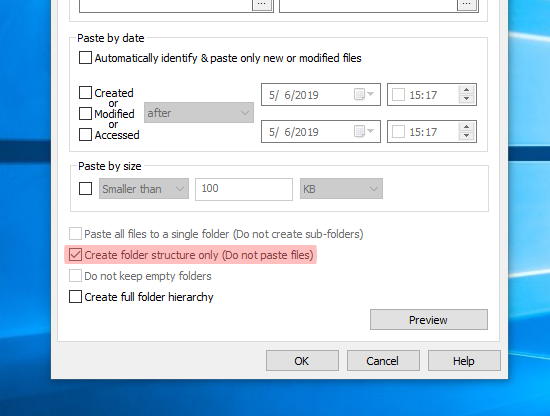
  3. The Settings dialog box will open. You can include or exclude files/folders to be copied by typing their names, file extensions, or folder names. You can also preview the list of files that will be copied and files that will be skipped by clicking on the Preview button. After confirming, press the Ok button in the Settings dialog box. All required files are copied successfully.

That’s it in this video.

For more tutorial videos, check out this page.

Subscribe to our YouTube channel for interesting videos.

Learn more about Copywhiz. Download the free trial from here.

Have a good day.

Thanks for staying till the end :)

Selectively pick files from multiple folders and compress them into a single zip file using Copywhiz

Hello Friends!

Watch the below video to know how to compress files from different folders into a single zip file in Windows using Copywhiz.

What is Copywhiz?

Copywhiz enhances your file-copy experience by letting you to have more flexibility & control over the file copying and backup process.

Here is how Copywhiz makes file copying a breeze:

  • Copy only new or modified files
  • Easily pick files by name, extension, folder etc from bunch of folders
  • Automatically organize files based on file attributes and metadata
  • Copy files to multiple folders/computers
  • Copy files from multiple folders and paste them at once
  • Sync files between source and destination
  • Pick files from multiple folders and compress in single .zip file
  • Schedule file backups
  • Verify copied files for data integrity
  • Retain security attributes of files & folders (ownership/user access)
  • Several more hidden nuggets designed to make your file-copy task easier.

Why Copywhiz?

Copywhiz comes very handily when you wish to compress files from different folders to a single zip file with the least effort. This way, you can easily share/upload a single zip file containing files from multiple folders.

Transcription:

  1. Select files using Windows Explorer, right-click on them and choose Copywhiz->Copy from the menu.
  2. Repeat Step 1 to copy files from multiple folders.
  3. Go to the destination folder where you wish to create the .zip file and select Copywhiz–> Paste Special–>Paste as compressed .zip file.
  4. Specify a name for the new .zip file and press OK. All the files selected in Copywhiz are compressed into a single zip file.

That’s it in this video.

For tutorial videos, check out this page.

Subscribe to our YouTube channel for interesting videos.

Learn more about Copywhiz. Download the free trial from here.

Have a good day.

Thanks for visiting our blog :)

Sending sticky notes over local network to other Windows PCs using Notezilla

Hi!

The video given below will tell you how to send sticky notes over local network across computers using Notezilla.

What is Notezilla?

Notezilla is a professional, elegant & highly rated sticky notes app for Windows & Phones (Android, iOS, iPhone, iPad etc). You can also access your sticky notes from a Mac.

Notezilla helps you organize various tiny bits of information you would need through out your life. It keeps all your notes, tasks & reminders handy where ever you are. With sticky notes, you hardly have to put effort to take notes, set reminders, etc. Quickly jot down & move on with your task at hand. 

Here are some features of Notezilla:

  • Sticky notes with reminders
  • Attach sticky notes to websites, documents, folders & apps
  • Organize sticky notes inside folders to keep your Windows desktop clean.
  • Pin sticky notes on top of other apps
  • Sync sticky notes between Windows, Android, iPhone, iPad
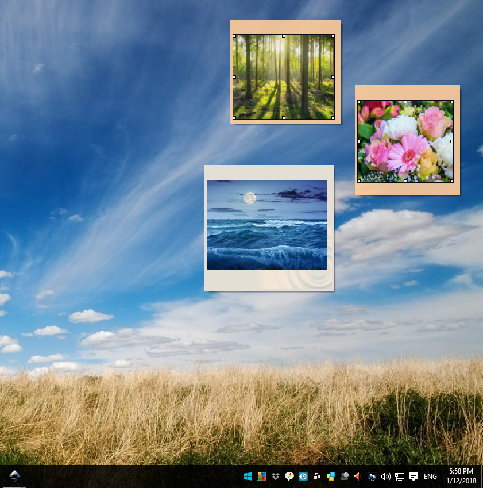
  • Add pictures inside sticky notes
  • Checklist sticky notes
  • Lock sticky notes (password protect)
  • Markdown support
  • Send notes over local network (LAN) or across the globe
  • Tag sticky notes
  • Fully transparent sticky notes
  • Dark mode

Notezilla allows you to send sticky notes to any computer using the computer name or the IP address. The sticky note will be received directly on the recipient’s Windows desktop if she is a Notezilla user too. Notezilla also supports sending notes to a group of computers at once. Using Notezilla, you can also send sticky notes to any computer outside your network anywhere in the world. However, this article will only show how to send sticky notes within a local network (LAN).

Transcription:

  1. Click on the Notezilla icon in the taskbar, select New Note and write your note.
  2. Click on the top-left button (Note Menu button) of the sticky note and select Send To –> Computer (Or press Ctrl+G).
  3. A dialog box window will appear. Click on Manage Computers –> Add Computers. Add computers in the text box as per the format and select Next. The computers are added successfully. Instead of computer names, you can also specify IP addresses. On certain networks, addressing by computer name may not work. In such cases, the IP address needs to be used.
  4. IMPORTANT: Follow the above steps on the recipient computer also (adding your computer to the recipient’s computer list in Notezilla). Doing this will ensure that the Firewall settings are updated on the receiving computer also.
  5. After adding computers, you can now select the computer from the computers list in Notezilla, tick the first checkbox before the name column and click Send Now button to send the sticky note.

Allow Notezilla through Windows Firewall

Make sure first to configure your PC firewall to allow the running of Notezilla. The firewall on the PC might sometimes not allow to send or receive notes.

You can search for the firewall in the Windows search box, and you will see “Allow an app through Windows Firewall.” Choose this option and enable Notezilla. If Notezilla is not listed, then click on ‘Allow another app’ and add Notezilla.

If you are using any other Firewall tool (usually included with Anti-Virus software), then you will have to configure that firewall.

Make sure you do this on both sending and receiving computer.

Subscribe to our YouTube channel for more such interesting videos.

That’s it in this video. For more tutorial videos, check out this page.

Check out our other cool products.

Have a good day

Thanks for taking the time to read :)

Notezilla Sticky Notes App for Android

Hello Everyone!

We are excited to announce the launch of Android app for Notezilla. Visit the Google Play Store from your Android device and download it today. Download & sync all your notes right on your Android phone using the new Notezilla android app. Check out Notezilla’s Android app.

Android_StickyNote

What is Notezilla?

Notezilla is a professional, elegant & highly rated sticky notes app for Windows & Phones (Android, iOS, iPhone, iPad etc). You can also access your sticky notes from a Mac.

Notezilla helps you organize various tiny bits of information you would need through out your life. It keeps all your notes, tasks & reminders handy where ever you are. With sticky notes, you hardly have to put effort to take notes, set reminders, etc. Quickly jot down & move on with your task at hand. 

Here are some features of Notezilla:

  • Sticky notes with reminders
  • Attach sticky notes to websites, documents, folders & apps
  • Organize sticky notes inside folders to keep your Windows desktop clean.
  • Pin sticky notes on top of other apps
  • Sync sticky notes between Windows, Android, iPhone, iPad
  • Add pictures inside sticky notes
  • Checklist sticky notes
  • Lock sticky notes (password protect)
  • Markdown support
  • Send notes over local network (LAN) or across the globe
  • Tag sticky notes
  • Fully transparent sticky notes
  • Dark mode

Check out Notezilla’s homepage.

Android_Widget

You can now sync sticky notes that you created using the Windows version of Notezilla with this Android app.

Here is a video depicting this feature:

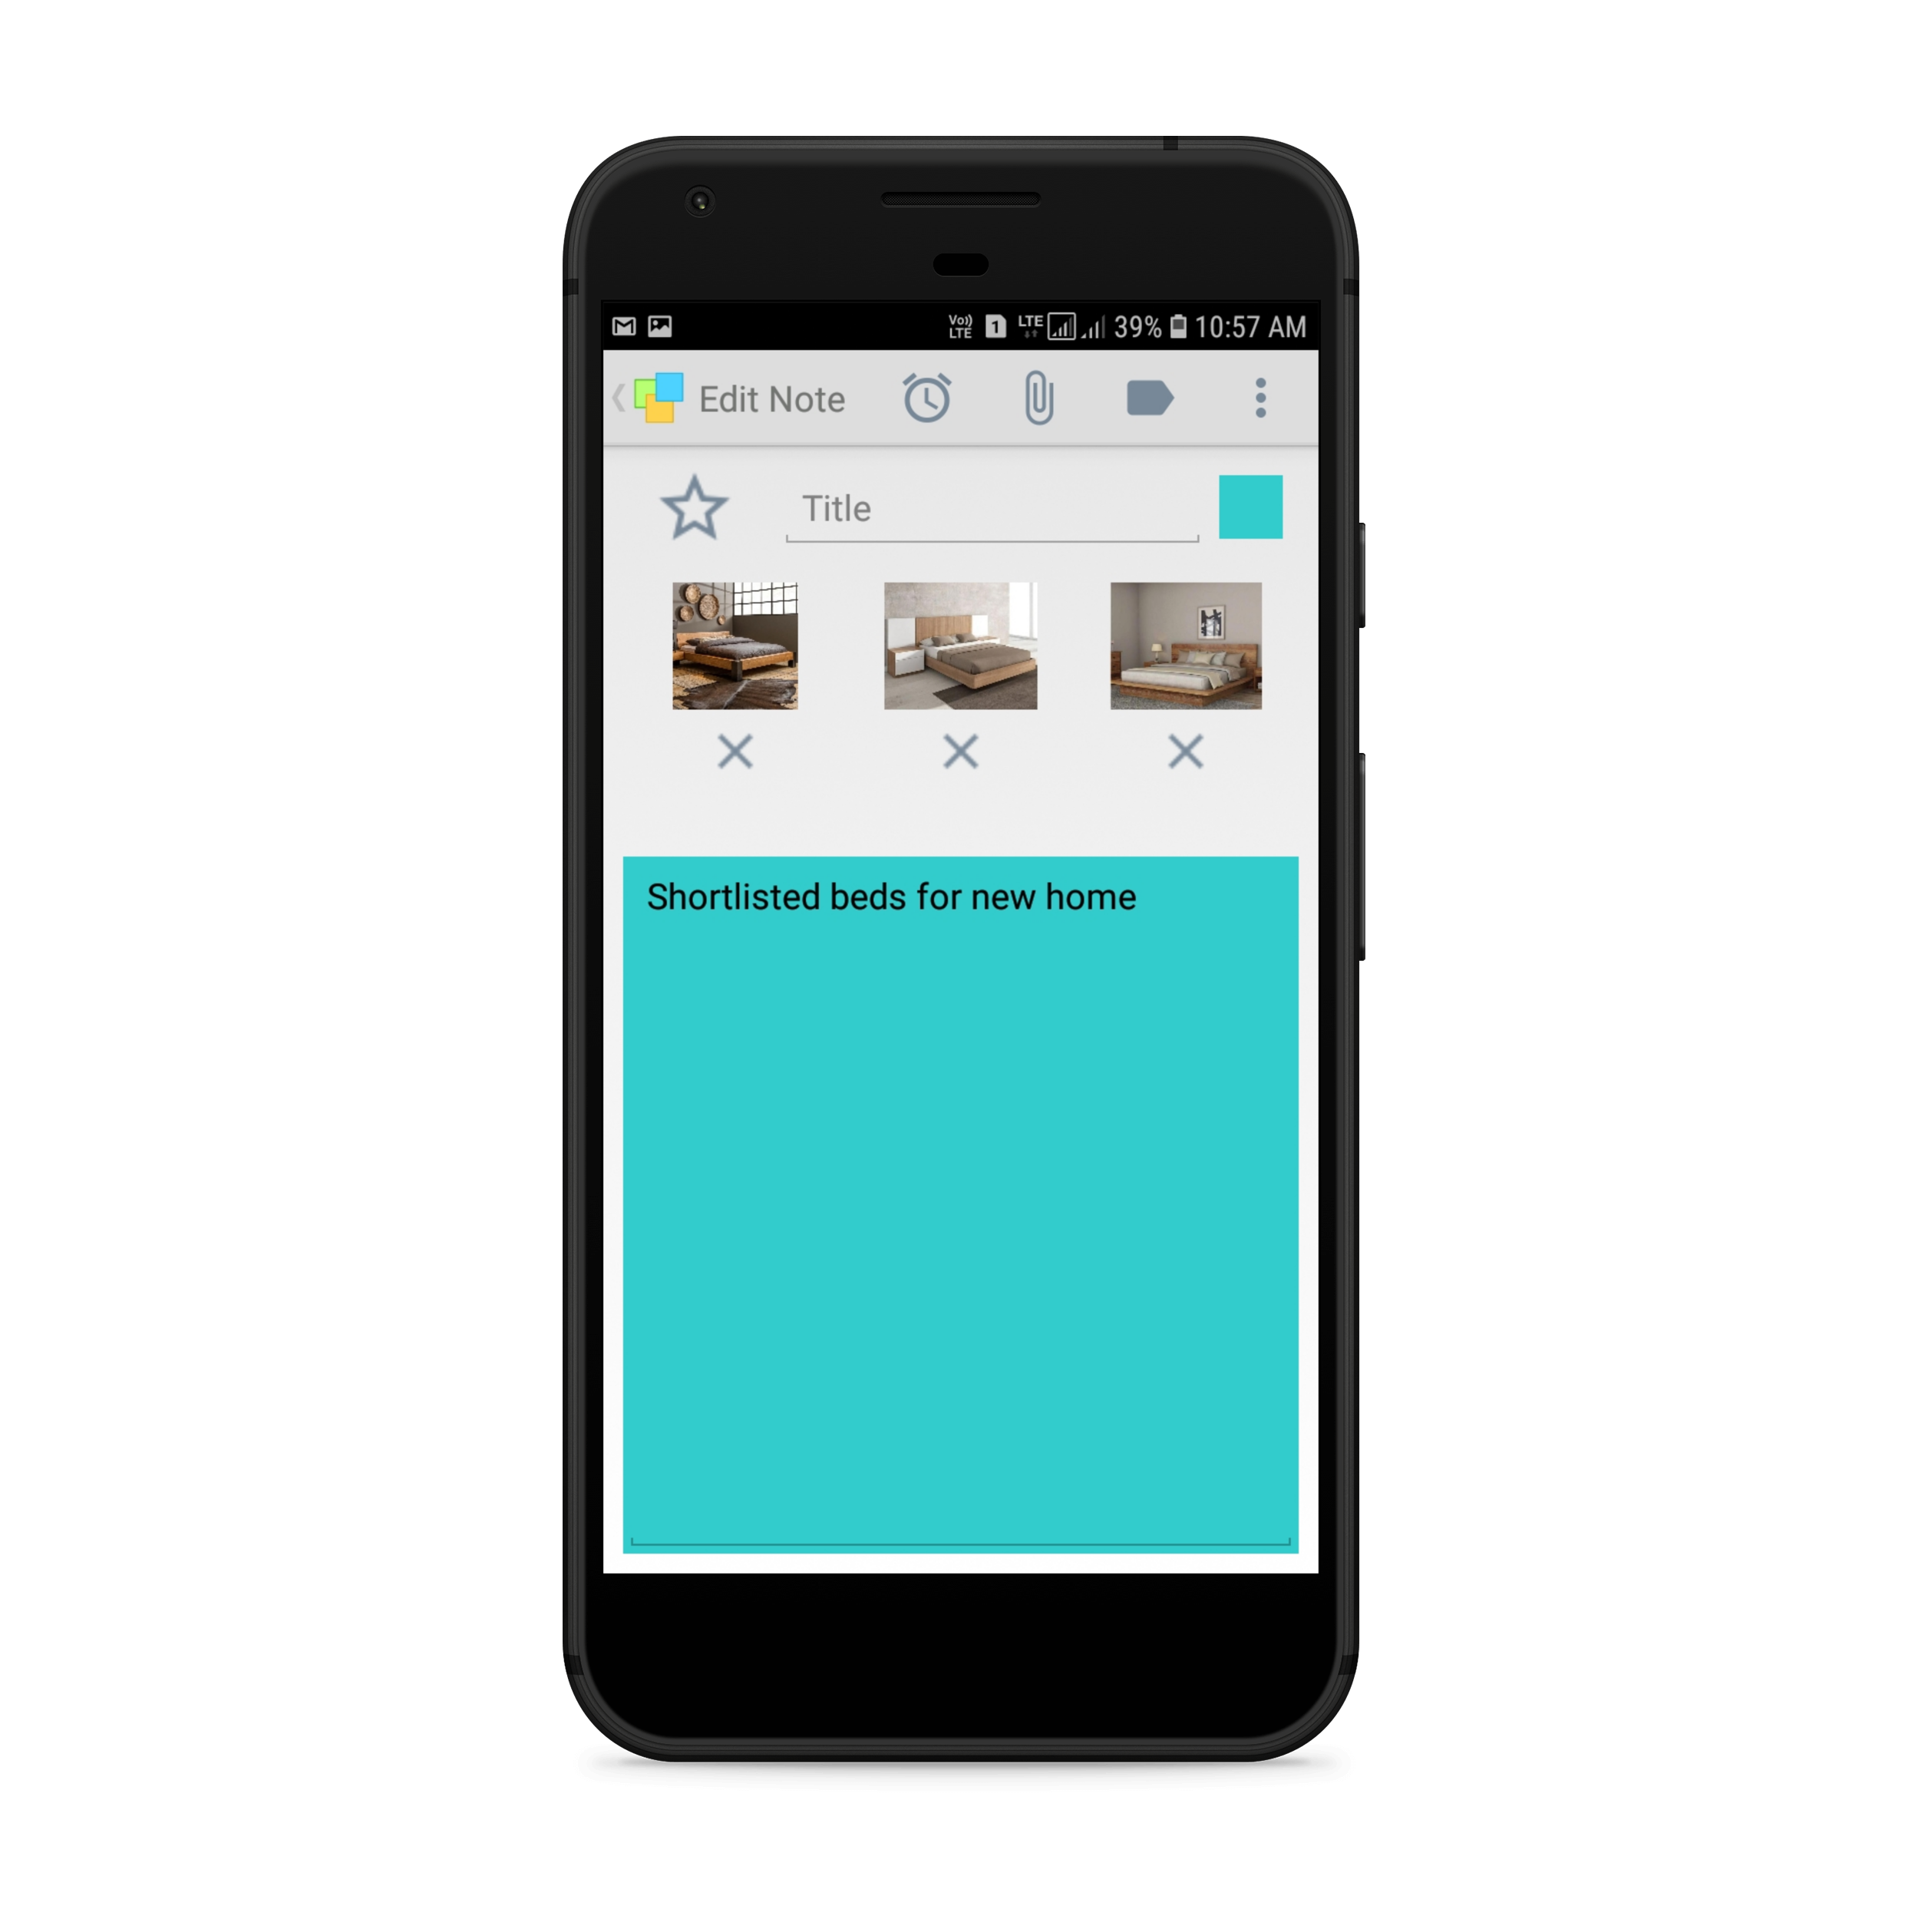
Here are some screenshots of the Android app.

Android_Noteslist
Notes List

The notes list is simple & intuitive. It gives a comprehensive view of the notes. It shows excerpts of notes, title, tag name, folder name, reminder time, etc. After you sync with the Windows version of Notezilla, all your sticky notes will appear in this list.

Android_Editnote
Edit Note

Create notes, set reminders, assign tags, change the color of the note, or send notes to contacts. After sync, these notes appear as sticky notes in the Windows version of Notezilla on your desktop.

Reminders

Set reminders to your notes so that you don’t miss any important activity or a task. Set repeat reminders at specific intervals by configuring the required re-occurrence interval for the reminder. The advantage of having a native app for Android is that you can receive reminders directly on your device. This is not possible when using our Notezilla.Net web-app.

Screenshot_Android_Pictures

Insert and sync pictures

Notezilla makes sticky notes more useful by providing the ability to insert pictures/images inside them. They prove to be useful when researching & collecting data on a particular topic. Very refreshing!

Android_Mainmenu
Main Menu

View notes with different filter options like tags, folders, starred notes, due notes, etc. Sync notes and access your notes from any other computer or a device like iPad, iPhone, etc.

Android_Tags
Tags

Tags are labels assigned to the notes. Tags help in grouping and locating notes quickly.

Android_Folders
Folders

Organize notes using folders. Folders are nothing but memoboards in the Windows version of Notezilla.

Android_Contacts
Contacts

Send notes & reminders to other contacts, right to their phone or on their Windows desktop. Your contact will receive it as a note if she is a Notezilla user; otherwise, she will receive it as an email.

Check out Notezilla’s Android app.

We wish you the best.

Thanks :)

Sending sticky notes to contact, over the internet, on Windows PCs using Notezilla

This video will guide you to send sticky notes via Internet to contacts across the globe using Notezilla.

What is Notezilla?

Notezilla is a professional, elegant & highly rated sticky notes app for Windows & Phones (Android, iOS, iPhone, iPad etc). You can also access your sticky notes from a Mac.

Notezilla helps you organize various tiny bits of information you would need through out your life. It keeps all your notes, tasks & reminders handy where ever you are. With sticky notes, you hardly have to put effort to take notes, set reminders, etc. Quickly jot down & move on with your task at hand. 

Here are some features of Notezilla:

  • Sticky notes with reminders
  • Attach sticky notes to websites, documents, folders & apps
  • Organize sticky notes inside folders to keep your Windows desktop clean.
  • Pin sticky notes on top of other apps
  • Sync sticky notes between Windows, Android, iPhone, iPad
  • Add pictures inside sticky notes
  • Checklist sticky notes
  • Lock sticky notes (password protect)
  • Markdown support
  • Send notes over local network (LAN) or across the globe
  • Tag sticky notes
  • Fully transparent sticky notes
  • Dark mode

Check out Notezilla’s homepage.

Sending sticky notes over the Internet

Notezilla allows you to send sticky notes to any contact world-wide. Notezilla uses the Notezilla.Net cloud to send sticky notes to your contacts. The sticky note will be received directly on the recipient’s Windows desktop, any tablet, or smart-phone if she is a Notezilla user too. Otherwise, she will receive the sticky note as an email in her mailbox.

Watch this short video for more clarity:

For more tutorial videos, check out this page.

Transcription:

  1. Click on the Notezilla icon in the taskbar, select New Note and write your note.
  2. Click on the top-left button (Note Menu button) of the sticky note and select Send To –> Contact (Or press Ctrl+Alt+G).
  3. A dialog box window will appear. Click on Manage Contacts –> Add Contacts. Add contacts in the text box as per the format and select Next. The contacts will be added successfully.
  4. Now, select the contact to whom you wish to send the note by clicking on the first check box before the name column. Click on Send Now button.

Sticky notes sent by other contacts are received during the next automatic sync with the Notezilla.Net cloud service. Once the sync completes, a notification will appear in the bottom-right of the recipient’s desktop. The note can be viewed directly or stuck to the Windows desktop.

That’s it in this video.

Subscribe to our YouTube channel for more such interesting videos.

Check out our other cool products.

Have a good day

Thanks for your time :)

If you found this post useful, do spread the word by sharing it.

Essential Notezilla settings on Windows

Hello Friends!

This video will demonstrate some essential, useful Notezilla settings for the Windows app.

What is Notezilla?

Notezilla is a professional, elegant & highly rated sticky notes app for Windows & Phones (Android, iOS, iPhone, iPad etc). You can also access your sticky notes from a Mac.

Notezilla helps you organize various tiny bits of information you would need through out your life. It keeps all your notes, tasks & reminders handy where ever you are. With sticky notes, you hardly have to put effort to take notes, set reminders, etc. Quickly jot down & move on with your task at hand. 

Here are some features of Notezilla:

  • Sticky notes with reminders
  • Attach sticky notes to websites, documents, folders & apps
  • Organize sticky notes inside folders to keep your Windows desktop clean.
  • Pin sticky notes on top of other apps
  • Sync sticky notes between Windows, Android, iPhone, iPad
  • Add pictures inside sticky notes
  • Checklist sticky notes
  • Lock sticky notes (password protect)
  • Markdown support
  • Send notes over local network (LAN) or across the globe
  • Tag sticky notes
  • Fully transparent sticky notes
  • Dark mode

Check out Notezilla’s homepage.

Watch this short video for more clarity:

For more tutorial videos, check out this page.

Transcription:

To change the settings of Notezilla, right-click on the Notezilla icon and select Preferences. In Preferences, you have various tabs, namely General tab, Note tab, Hotkeys tab, and Advanced tab.

General tab:

Preferences-General-Tab
  1. New notes can be created in specific desktop area. It is very useful while using multiple monitors. Configure the desktop area of the sticky notes by selecting Set Desktop Area.
  2. Allows to configure how Notezilla should respond to a single/double click and what it should display accordingly.
  3. Default advance reminder time, snooze duration and reminder sound can be configured here.
  4. You can enable auto spell check here.

Note tab:

Preferences-Note-Tab
  1. Size – Lets you to change the default sticky note size.
  2. Size to content – Which enables/ disables automatic sticky note resizing.
  3. Stay on top – Keeps sticky notes always on top of other apps.

Hotkeys tab: Create hotkeys for faster access to your sticky notes.

Preferences-Hotkeys-Tab

Advanced tab: Helps in maintaining your data and security.

Preferences-Advanced-Tab
  1. Data Folder – Displays the folder where Notezilla stores all its data. Choose the Browse button if you wish to change this location.
  2. Backup Folder – Notezilla takes sticky notes backup, every time it launches. It keeps five backup copies of all its data in this folder. If you want to change this location, choose the Browse button and select the desired folder.
  3. Set Master Password – You can set your master password to lock/unlock sticky notes and memoboards.

That’s it in this video.

Learn more about Notezilla. Download the free trial from here.

Subscribe to our YouTube channel for interesting videos.

Check out our other cool products.

Have a good day!

Thanks for your time :)

Windows: Changing sticky notes fonts, add bullets, numbering and format text using Notezilla

Hi guys!

Today we have a video that will show you how to change sticky notes text (font, color, size), add bullets, numbers and format text in Notezilla sticky notes.

Since many digital sticky note apps like Windows Sticky Notes don’t offer these simple text and sticky note formatting options, this post is the answer to people searching for one app that does provide these features.

For more tutorial videos, check out this page.

What is Notezilla?

Notezilla is a professional, elegant & highly rated sticky notes app for Windows & Phones (Android, iOS, iPhone, iPad etc). You can also access your sticky notes from a Mac.

Notezilla helps you organize various tiny bits of information you would need through out your life. It keeps all your notes, tasks & reminders handy where ever you are. With sticky notes, you hardly have to put effort to take notes, set reminders, etc. Quickly jot down & move on with your task at hand. 

Here are some features of Notezilla:

  • Sticky notes with reminders
  • Attach sticky notes to websites, documents, folders & apps
  • Organize sticky notes inside folders to keep your Windows desktop clean.
  • Pin sticky notes on top of other apps
  • Sync sticky notes between Windows, Android, iPhone, iPad
  • Add pictures inside sticky notes
  • Checklist sticky notes
  • Lock sticky notes (password protect)
  • Markdown support
  • Send notes over local network (LAN) or across the globe
  • Tag sticky notes
  • Fully transparent sticky notes
  • Dark mode
Insert Pictures Inside Sticky Notes

We understand the importance of having formatting options for your sticky notes. Every one of us wants to customize our sticky notes experience, and such formatting features are the most basic we expect from any digital sticky notes app.

Notezilla supports lots of text formatting features like change font style (font, size & color), add bullets & numbering, outlining (multi-level bullets & numbering), count words, characters, insert current date & time inside a sticky note, paste as plain unformatted text, automatic spell-check.

Video Transcription:

Choose ‘New Note’ from the Notezilla icon in the taskbar and write your note.
When you open a sticky note, you will see the Note Toolbar sliding up with multiple options: Stay On Top, Hide Note, Roll Up/Down note, and Trash Note.

Check out Notezilla’s homepage.

  • Stay On Top is the pin on the right-side of the Note toolbar of the sticky note.It keeps the sticky note always on top of all other programs which is very, very useful when collecting notes or referring to existing notes while working with another app.
  • Hide Note hides the sticky note from the desktop which you can bring it up again from the Notes Browser or by using the ‘Show All Notes‘ option from Notezilla menu.
  • Roll Up/Down Note saves desktop space and makes it cleaner by showing only the title of the note and not the entire content. Also lets you hide some sensitive information from onlookers passing by.
  • Trash Note deletes the sticky note and sends it to the Trash memoboard, so that you can retrieve it back anytime.
  • Notezilla Sticky Notes can be made more attractive according to one’s personal choice.To change the color, skin, and transparency of the sticky note, click on the top-left button of the sticky note and select the appropriate option from the menu.

    Skins can be downloaded from our website, check out Notezilla’s homepage.

  • To arrange desktop sticky notes, right-click on the Notezilla icon, choose Desktop Notes –> Arrange Notes. Select the desired Layout and Sort options and click OK.
  • To insert date and time inside a sticky note, Right-click inside the sticky note to show the formatting menu and choose More–> Short date & time or Long date & time.
  • Right-click inside the sticky note to show the formatting menu wherein you can change the font, font size, font color, and font style according to your preferences.
  • You can also add bullets and numbering inside the sticky notes from the formatting menu. To directly add bullets inside the notes press Ctrl+Shift+L.
  • Checklist option when selected from the formatting menu adds a check box in front of each lined item which can be ticked off based on the completion of the task.
  • To find a text inside a single sticky note, select Find from the formatting menu.Alternatively, press Ctrl+F inside a single sticky note.
  • Automatic spell check can be enabled on the sticky notes . Right-click on the Notezilla icon and choose Preferences and enable the Spell check option.Once enabled, all the misspelled words are highlighted in red. Moreover, it also suggests various options based on the spelling.
  • To have the character count, word count etc , select Statistics from the formatting menu.

That’s it in this video.

So how about giving it a try today.

The best part of Notezilla is that it can sync notes between your mobile and PC or laptop! Therefore, you have the exact notes at both places! Try the sync feature today! You will surely love it.

Learn more about Notezilla.

Subscribe to our YouTube channel for interesting videos.

Check out our other cool products.

Have a good day!

Thanks for your time :)

Grouping sticky notes by starring and tagging on Windows PCs using Notezilla

Hi!

The following video will depict how to organize sticky notes by starring and tagging them in Notezilla.

What is Notezilla?

Notezilla is a professional, elegant & highly rated sticky notes app for Windows & Phones (Android, iOS, iPhone, iPad etc). You can also access your sticky notes from a Mac.

Notezilla helps you organize various tiny bits of information you would need through out your life. It keeps all your notes, tasks & reminders handy where ever you are. With sticky notes, you hardly have to put effort to take notes, set reminders, etc. Quickly jot down & move on with your task at hand. 

Here are some features of Notezilla:

  • Sticky notes with reminders
  • Attach sticky notes to websites, documents, folders & apps
  • Organize sticky notes inside folders to keep your Windows desktop clean.
  • Pin sticky notes on top of other apps
  • Sync sticky notes between Windows, Android, iPhone, iPad
  • Add pictures inside sticky notes
  • Checklist sticky notes
  • Lock sticky notes (password protect)
  • Markdown support
  • Send notes over local network (LAN) or across the globe
  • Tag sticky notes
  • Fully transparent sticky notes
  • Dark mode
Tags-Window

An image depicting one of the features of Notezilla.

Check out Notezilla’s homepage.

Often, users would like to access and work on sticky notes from different memoboards at the same time. Notezilla allows the users to work on multiple notes simultaneously by grouping and starring them using the Notes Browser. It helps in accessing notes faster with the keywords.

For more tutorial videos, check out this page.

Transcription:

Grouping notes by starring will temporarily group notes from different memoboards.

  1. To group sticky notes by Starring, Right-click on the Notezilla icon in the task bar and select Notes Browser.
  2. Star sticky notes in different memoboards by a left-click in the 1st column.
  3. Click on the Starred filter inside the Filters pane to view all your starred notes.

Starring sticky notes allow you to work on multiple notes from different memoboards at the same time. It also helps you in printing sticky notes together from different memoboards.

Tagging sticky notes

To tag a sticky note:

  1. Right-click on a note and select Tags. A new dialog box will appear. Type multiple keywords(tags) and press, OK.
  2. Another quick way of tagging the note is to select the keyword from the existing tags list in the menu.

Searching sticky notes by tags
To list out the sticky notes based on the tags, move the cursor to the Search button placed in the bottom-left of the Notes Browser. Select Tags in the Look in drop-down list, type the tag name in the Keywords box and click on Search. All the notes with that particular tag will be listed.

That’s it in this video.

Subscribe to our YouTube channel for interesting videos.

Check out our other cool products.

Have a good day.

Thanks for reading till the end :)