Organize pictures based on the date they were taken on, using Copywhiz for Windows

We all love pictures. They are the perfect way to store our precious memories.

If you have lots of pictures in your system, you know how difficult it is to manually sort and organize them. But no worries, Copywhiz has an easy hack for you!

What is Copywhiz?

Copywhiz enhances your file-copy experience by letting you to have more flexibility & control over the file copying and backup process.

Here is how Copywhiz makes file copying a breeze:

  • Copy only new or modified files
  • Easily pick files by name, extension, folder etc from bunch of folders
  • Automatically organize files based on file attributes and metadata
  • Copy files to multiple folders/computers
  • Copy files from multiple folders and paste them at once
  • Sync files between source and destination
  • Pick files from multiple folders and compress in single .zip file
  • Schedule file backups
  • Verify copied files for data integrity
  • Retain security attributes of files & folders (ownership/user access)
  • Several more hidden nuggets designed to make your file-copy task easier.

This post will tell how you can quickly organize pictures based on the date they were taken, on your Windows PC.

Here is a short video that depicts the steps:

Video Transcript:

  1. Go to the folder that has your picture files.
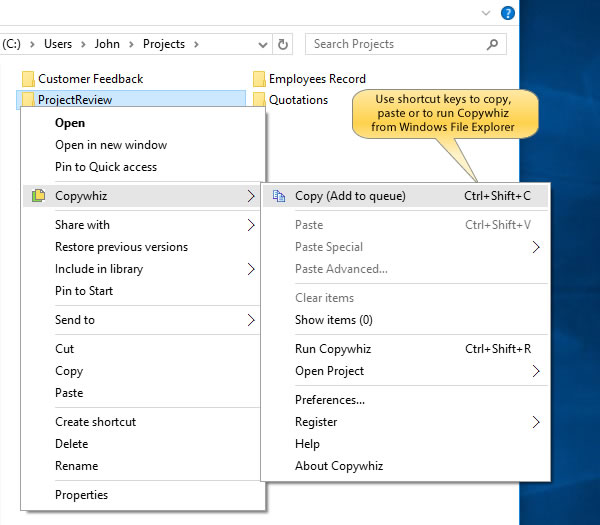
  2. Select the folder, right-click and add it to Copywhiz.
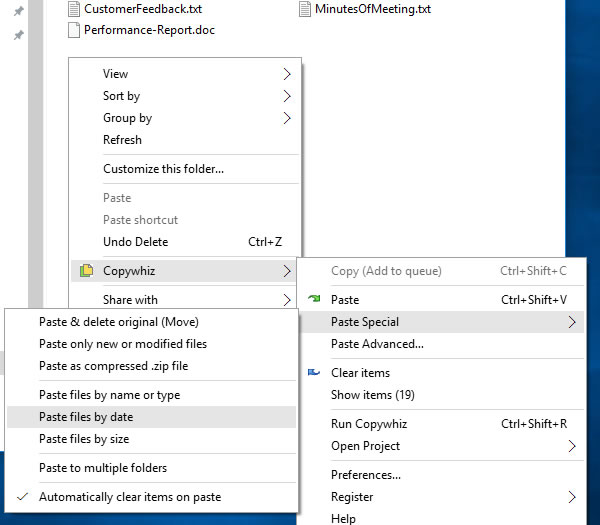
  3. Go to the destination folder, right-click and choose Copywhiz Paste Advanced.
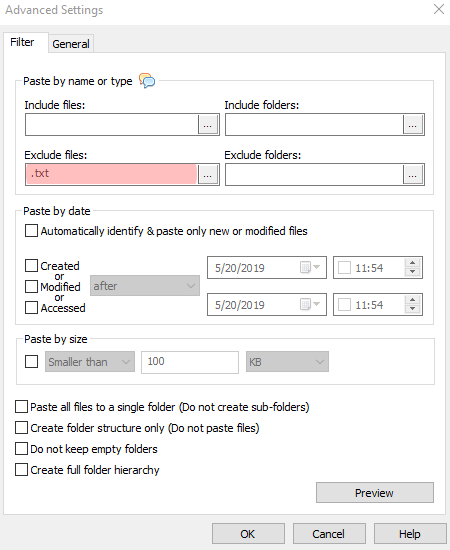
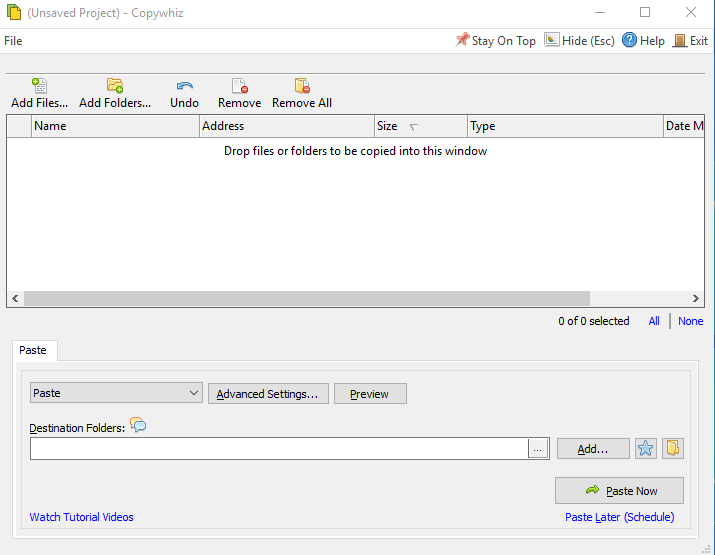
  4. The Copywhiz main window will open. Click on the Advanced Settings button.
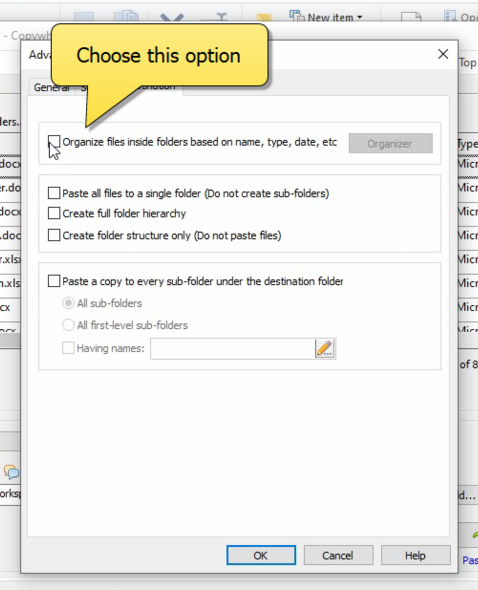
  5. In the Destination Tab, choose the option ‘Organize files inside folders based on name, type, date, etc.’
  6. Click on the Organizer button.
  7. Under the file property section, choose ‘Date created’ and under the format section, choose the format you want it to be in.
  8. Click on OK and Paste Now.
  9. The files will be copied in separate folders based on their creation date!

That’s it! What would take hours manually is achieved in a few minutes using Copywhiz.

You can also schedule automatic file backups and take incremental backups using Copywhiz.

Learn more about Copywhiz. Download the free trial from here.

For short tutorial videos, Check out this page.

Subscribe to our YouTube channel for interesting videos.

Check out our other cool products.

Have a good day!

Thanks for reading till the end :)

Watch a folder for changes and automatically organize files in Windows, using Copywhiz

We constantly work with multiple folders for our projects and it is difficult to keep a check on the modifications made in each folder.

What if our folders were automatically monitored and the files automatically organized on a timely basis? Copywhiz file copy and backup app can do that for you!

What is Copywhiz?

Copywhiz enhances your file-copy experience by letting you to have more flexibility & control over the file copying and backup process.

Here is how Copywhiz makes file copying a breeze:

  • Copy only new or modified files
  • Easily pick files by name, extension, folder etc from bunch of folders
  • Automatically organize files based on file attributes and metadata
  • Copy files to multiple folders/computers
  • Copy files from multiple folders and paste them at once
  • Sync files between source and destination
  • Pick files from multiple folders and compress in single .zip file
  • Schedule file backups
  • Verify copied files for data integrity
  • Retain security attributes of files & folders (ownership/user access)
  • Several more hidden nuggets designed to make your file-copy task easier.

This post will show how to monitor a particular folder and automatically organize files from that folder, on a regular basis.

Here is a short video that shows how to achieve this:

Video Transcript:

  1. In this video, we will organize files from the downloads folder to the office folder.
  2. Select the Downloads folder, right-click and copy using Copywhiz.
  3. Go to the destination folder, right-click and choose Copywhiz Paste Advanced.
  4. The Copywhiz main window will open. Click on the Advanced Settings button.
  5. In the Destination Tab, choose the option ‘Organize files inside folders based on name, type, date, etc.’
  6. Click on the Organizer button.
  7. Under the file property section, choose ‘File Extension’ from the drop-down. This will create separate folders based on the various types of files.
  8. Click on OK.
  9. Since we are organizing files, we will move the files instead of copying them. To do this, choose the option ‘Paste & delete original (move)’.
  10. Paste the files.
  11. Check the Downloads folder and you will find it empty. This is because we moved files instead of just copying them.
  12. To repeat this action automatically at regular intervals, we will schedule the Copywhiz project.
  13. But first, we need to save the project.
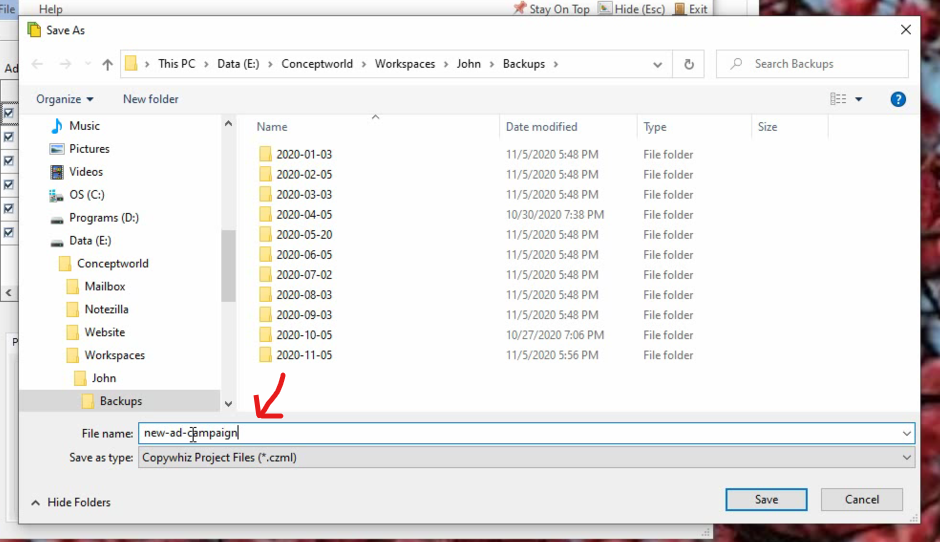
  14. Click on File-> Save As in the top-left corner of the Copywhiz main window.
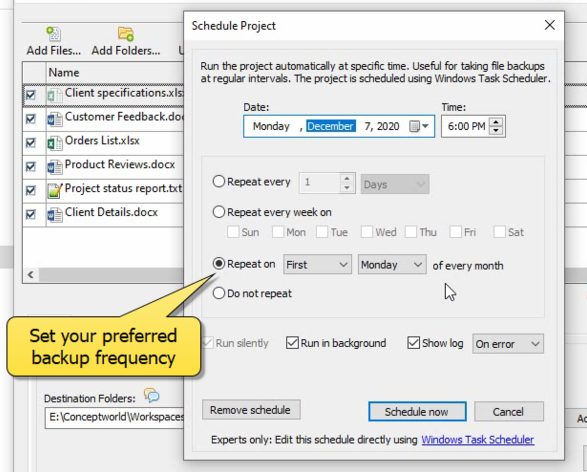
  15. Once the project is saved, click on ‘Paste Later( Schedule).’
  16. Select the backup frequency and other options based on your preference.
  17. Schedule this project and it will now perform the action automatically at the time specified!

Who could imagine that you could automatically organize hundreds of files in your system with so much ease! Well, Copywhiz did.

Learn more about Copywhiz. Download the free trial from here.

For short tutorial videos, Check out this page.

Subscribe to our YouTube channel for interesting videos.

Check out our other cool products.

Have a good day!

Thank you :)

Use regular expression to automatically organize files by their name in Windows, using Copywhiz

This is a post for all those who use regular expression for their daily file copy and organization tasks.

What is Copywhiz?

Copywhiz enhances your file-copy experience by letting you to have more flexibility & control over the file copying and backup process.

Here is how Copywhiz makes file copying a breeze:

  • Copy only new or modified files
  • Easily pick files by name, extension, folder etc from bunch of folders
  • Automatically organize files based on file attributes and metadata
  • Copy files to multiple folders/computers
  • Copy files from multiple folders and paste them at once
  • Sync files between source and destination
  • Pick files from multiple folders and compress in single .zip file
  • Schedule file backups
  • Verify copied files for data integrity
  • Retain security attributes of files & folders (ownership/user access)
  • Several more hidden nuggets designed to make your file-copy task easier.

You can configure Copywhiz for your file copy and backup tasks using regular expression. We have a short video that will show how to automatically organize files in separate folders based on the regular expression you specify.

Video Transcript:

  1. For our video, we took a folder with various files named by employee name in the format of First name followed by last name.
  2. We will now create a folder by the last name and place files in them accordingly using regular expression.
  3. Select the files, right-click and add them to Copywhiz.
  4. Go to the destination folder, right-click and choose Copywhiz Paste Advanced.
  5. The Copywhiz main window will open. Click on the Advanced Settings button in there.
  6. In the Destination Tab, choose the option ‘Organize files inside folders based on name, type, date, etc.’
  7. Click on the Organizer button.
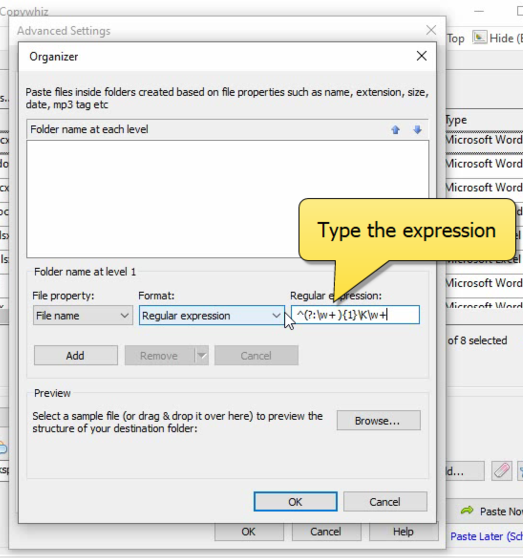
  8. Under the file property section, choose ‘File Name’ and under the format section, choose ‘Regular Expression’ from the drop down.
  9. Type the expression ^(?:\w+ ){1}\K\w+ which will select the second word in the file name.
  10. Click on OK and Paste Now.
  11. You will see the files pasted in separate folders based on the second name of the employee.

Organizing files is so easy with Copywhiz. The best part is, it is customizable based on the task you want to achieve.

You can also schedule automatic file backups and take incremental backups using Copywhiz.

Learn more about Copywhiz. Download the free trial from here.

For short tutorial videos, Check out this page.

Subscribe to our YouTube channel for interesting videos.

Check out our other cool products.

Have a good day!

Thanks for your time :)

Run Copywhiz program without logging into the Windows PC

We have received many queries regarding running Copywhiz without having to log in to Windows.

You can do that, and this post will tell you how.

Once you schedule a project, you can have it run without being logged in to your Windows PC. This is because Copywhiz schedules the project using Windows Task Scheduler.

So once you have scheduled a project in Copywhiz, you should be able to configure the Windows Task Scheduler to run that process with higher privilege so that the user doesn’t have to be logged in.

What is Copywhiz?

Copywhiz enhances your file-copy experience by letting you to have more flexibility & control over the file copying and backup process.

Here is how Copywhiz makes file copying a breeze:

  • Copy only new or modified files
  • Easily pick files by name, extension, folder etc from bunch of folders
  • Automatically organize files based on file attributes and metadata
  • Copy files to multiple folders/computers
  • Copy files from multiple folders and paste them at once
  • Sync files between source and destination
  • Pick files from multiple folders and compress in single .zip file
  • Schedule file backups
  • Verify copied files for data integrity
  • Retain security attributes of files & folders (ownership/user access)
  • Several more hidden nuggets designed to make your file-copy task easier.

Here are the steps:

  1. Schedule the Copywhiz project.

You can watch this video to learn how:

2. In Windows Task Scheduler you should be able to see a folder called Copywhiz . Under that you will see the task.

  1. Open properties for your task and select the option “Run whether user is logged in or not” and “Run with highest privileges”.

4. If you want to run the project even when the computer is switched off, go to the Conditions tab and make sure you check “Wake the computer to run this task”.

That’s it! Now the project will run at the scheduled time even when you are not logged in on your system.

Learn more about Copywhiz. Download the free trial from here.

For short tutorial videos, Check out this page.

Subscribe to our YouTube channel for interesting videos.

Check out our other cool products.

Have a good day!

Thanks for reading :)

Inserting bullets and numbers in Notezilla sticky notes

Bullets and numbered lists are very helpful if you do a lot of research or need to take quick short notes for anything.

Most sticky note software do not provide the option of bullets and numbering but Notezilla does. You can create bulleted and numbered lists of multiple levels.

What is Notezilla?

Notezilla is a professional, elegant & highly rated sticky notes app for Windows & Phones (Android, iOS, iPhone, iPad etc). You can also access your sticky notes from a Mac.

Notezilla helps you organize various tiny bits of information you would need through out your life. It keeps all your notes, tasks & reminders handy where ever you are. With sticky notes, you hardly have to put effort to take notes, set reminders, etc. Quickly jot down & move on with your task at hand. 

Here are some features of Notezilla:

  • Sticky notes with reminders
  • Attach sticky notes to websites, documents, folders & apps
  • Organize sticky notes inside folders to keep your Windows desktop clean.
  • Pin sticky notes on top of other apps
  • Sync sticky notes between Windows, Android, iPhone, iPad
  • Add pictures inside sticky notes
  • Checklist sticky notes
  • Lock sticky notes (password protect)
  • Markdown support
  • Send notes over local network (LAN) or across the globe
  • Tag sticky notes
  • Fully transparent sticky notes
  • Dark mode
Insert Pictures Inside Sticky Notes
An image depicting one of the features of Notezilla

Creating a bulleted or numbered list in sticky notes

Here’s a short video for your guidance:

Select the content of the sticky note that you want to convert into a bulleted or numbered list, right-click and choose the option ‘Bullets & Numbering’ and choose the type of list you want to add.

The note will quickly get converted into a list.

Really simple and fast!

The best part of Notezilla is that it can sync notes between your mobile and PC or laptop! Therefore, you have the exact notes at both places! Try the sync feature today! You will surely love it.

Download it from the Play Store or App Store today and sync all your sticky notes with the Windows version of Notezilla.

Learn more about Notezilla.

Subscribe to our YouTube channel for interesting videos.

Check out our other cool products.

Have a good day!

Thanks for reading :)

Automatically arrange desktop sticky notes in Windows using Notezilla

Working with sticky notes is addictive. Once you get used to working with digital sticky notes, you create notes for almost everything, from a short task to a long term plan.

If you are one of those people, then you will often find your desktop cluttered with sticky notes at all places. It might get difficult to access things on the desktop, including the sticky notes.

You might manually arrange them once or twice, but let’s admit, we all feel lazy to arrange the notes, especially if there are lots. We therefore have a quick option for you- automatically arrange all the Notezilla sticky notes on your desktop in an organized manner.

What is Notezilla?

Notezilla is a professional, elegant & highly rated sticky notes app for Windows & Phones (Android, iOS, iPhone, iPad etc). You can also access your sticky notes from a Mac.

Notezilla helps you organize various tiny bits of information you would need through out your life. It keeps all your notes, tasks & reminders handy where ever you are. With sticky notes, you hardly have to put effort to take notes, set reminders, etc. Quickly jot down & move on with your task at hand. 

Here are some features of Notezilla:

  • Sticky notes with reminders
  • Attach sticky notes to websites, documents, folders & apps
  • Organize sticky notes inside folders to keep your Windows desktop clean.
  • Pin sticky notes on top of other apps
  • Sync sticky notes between Windows, Android, iPhone, iPad
  • Add pictures inside sticky notes
  • Checklist sticky notes
  • Lock sticky notes (password protect)
  • Markdown support
  • Send notes over local network (LAN) or across the globe
  • Tag sticky notes
  • Fully transparent sticky notes
  • Dark mode
Access_Notes_From_Phone
An image showing one of the features of Notezilla

Automatically arranging desktop notes

Here’s a short video on this feature:

Right-click on the Notezilla icon and select ‘Desktop notes’-> ‘Arrange notes’.

The following box will appear where you can choose to arrange your notes based on different criteria like date created, modified, accessed, due date and note title, in either ascending or descending order.

Click on OK and the notes will be instantly arranged in a neat manner.

The desktop now looks clean and helps you stay productive.

The best part of Notezilla is that it can sync notes between your mobile and PC or laptop! Therefore, you have the exact notes at both places! Try the sync feature today! You will surely love it.

Download it from the Play Store or App Store today and sync all your sticky notes with the Windows version of Notezilla.

Learn more about Notezilla.

Subscribe to our YouTube channel for interesting videos.

Check out our other cool products.

Have a good day!

Thank you :)

Copy files to specific sub-folders under the destination folder in Windows

In our previous post, we talked about how you can paste your files in all sub-folders of the destination folder. Read it here if you still haven’t:

Here’s another exciting feature for you all. Using Copywhiz, you can copy your files to only specific sub-folders (any level deep) inside the destination folder.

What is Copywhiz?

Copywhiz enhances your file-copy experience by letting you to have more flexibility & control over the file copying and backup process.

Here is how Copywhiz makes file copying a breeze:

  • Copy only new or modified files
  • Easily pick files by name, extension, folder etc from bunch of folders
  • Automatically organize files based on file attributes and metadata
  • Copy files to multiple folders/computers
  • Copy files from multiple folders and paste them at once
  • Sync files between source and destination
  • Pick files from multiple folders and compress in single .zip file
  • Schedule file backups
  • Verify copied files for data integrity
  • Retain security attributes of files & folders (ownership/user access)
  • Several more hidden nuggets designed to make your file-copy task easier.
An image depicting one of the features of Copywhiz

Copy files to specific sub-folders (any level deep) under the destination folder

Here’s a short video on this feature:

1. After you select your files in Copywhiz, go to the destination folder and Choose ‘Copywhiz -> Paste Advanced’.

2. The Copywhiz main window will open. Choose the Advanced Settings Tab from there.

3. Go to the Destination Tab and choose the ‘Paste a copy to every sub-folder under the destination tab ’ option. Type the name of the folder in the box. You can specify multiply folders too.

4. Click on OK and proceed with ‘Paste Now’ option.

Why Copywhiz?

Copywhiz really saves your time and efforts in organizing and moving files. It is also easy to understand and use.

You can also schedule automatic file backups and take incremental backups using Copywhiz.

Learn more about Copywhiz. Download the free trial from here.

For short tutorial videos, Check out this page.

Subscribe to our YouTube channel for interesting videos.

Check out our other cool products.

Have a good day!

Thanks for visiting our blog :)

Copy files to every sub-folder inside a folder in Windows

This post is about an interesting feature of Copywhiz. Copywhiz for Windows lets you copy files inside each sub-folder under the destination folder. You can choose to create a copy under all sub-folders (at any level) or just the first level sub-folders.

What is Copywhiz?

Copywhiz enhances your file-copy experience by letting you to have more flexibility & control over the file copying and backup process.

Here is how Copywhiz makes file copying a breeze:

  • Copy only new or modified files
  • Easily pick files by name, extension, folder etc from bunch of folders
  • Automatically organize files based on file attributes and metadata
  • Copy files to multiple folders/computers
  • Copy files from multiple folders and paste them at once
  • Sync files between source and destination
  • Pick files from multiple folders and compress in single .zip file
  • Schedule file backups
  • Verify copied files for data integrity
  • Retain security attributes of files & folders (ownership/user access)
  • Several more hidden nuggets designed to make your file-copy task easier.

Copy files under every sub-folder under the destination folder

Here’s a short video on this feature:

1. After you select your files in Copywhiz, go to the destination folder and Choose ‘Copywhiz -> Paste Advanced’.

2. The Copywhiz main window will open. Choose the Advanced Settings Tab from there.

3. Go to the Destination Tab and choose the ‘Paste a copy to every sub-folder under the destination tab ’ option. Here you can choose to paste under all sub-folders, or just first-level sub-folders, in the folder structure.

4. Click on OK and then the ‘Paste Now’ option.

Conclusion

Copywhiz thus is a simple and easy tool with advanced features and huge benefits!

You can also schedule automatic file backups and take incremental backups using Copywhiz.

Learn more about Copywhiz. Download the free trial from here.

For short tutorial videos, Check out this page.

Subscribe to our YouTube channel for interesting videos.

Check out our other cool products.

Have a good day!

Thanks for reading till the end :)
Copy or backup files created, accessed or modified in last ‘X’ days in Windows

This post will show you how to copy or backup files created, accessed or modified in last ‘X’ days. It is real quick with the tool call Copywhiz (for Windows)

When we are working on a project, we access and modified several documents scattered in various folders. After certain days, how you will identify which files were touched? Doing this manually is extremely tedious or say, virtually impossible.

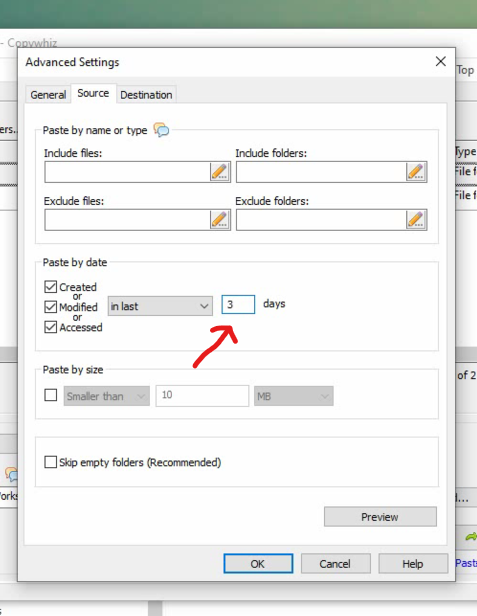
Here is where Copywhiz comes to your rescue by letting you do a selective file copy/backup. You can copy files created in the past ‘X’ number of days. So instead of specifying a date range of files created between this and this date, just mention the number of days, says 15 days.

What is Copywhiz?

Copywhiz enhances your file-copy experience by letting you to have more flexibility & control over the file copying and backup process.

Here is how Copywhiz makes file copying a breeze:

  • Copy only new or modified files
  • Easily pick files by name, extension, folder etc from bunch of folders
  • Automatically organize files based on file attributes and metadata
  • Copy files to multiple folders/computers
  • Copy files from multiple folders and paste them at once
  • Sync files between source and destination
  • Pick files from multiple folders and compress in single .zip file
  • Schedule file backups
  • Verify copied files for data integrity
  • Retain security attributes of files & folders (ownership/user access)
  • Several more hidden nuggets designed to make your file-copy task easier.
An image depicting one of the features of Copywhiz

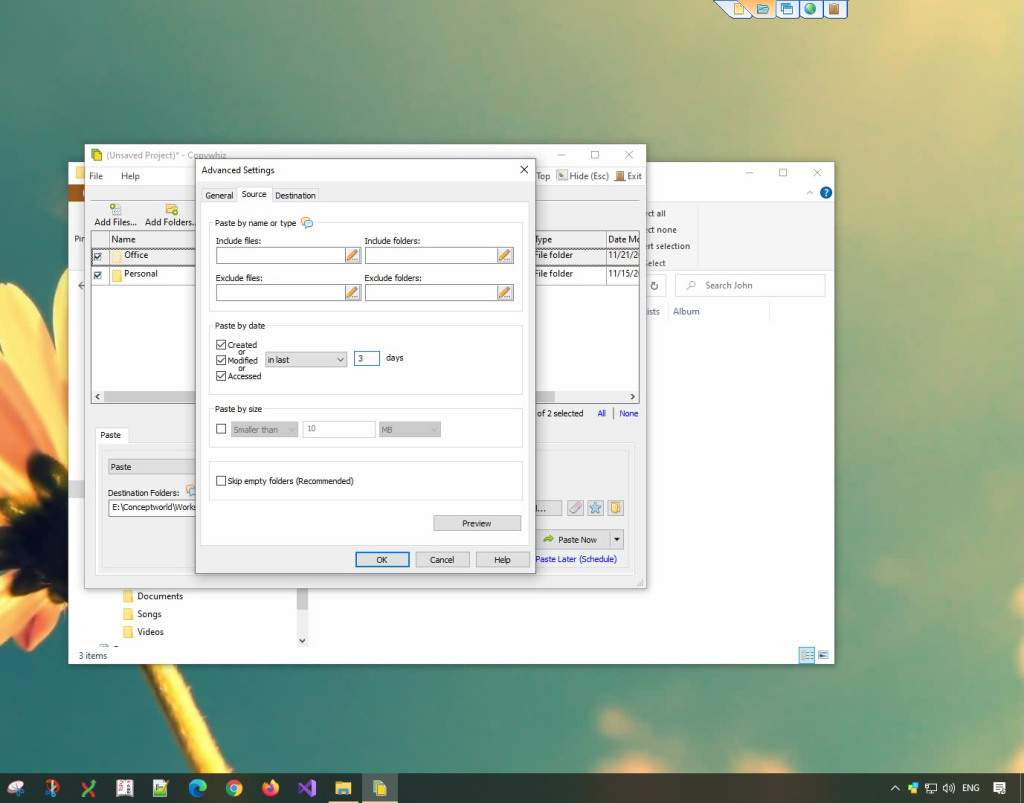
Copy only files created, accessed and modified in the last ‘X’ days

Here’s a short video on this feature:

1. After you select your files in Copywhiz, go to the destination folder and Choose ‘Copywhiz -> Paste Advanced’.

2. The Copywhiz main window will open. Choose the Advanced Settings Tab from there.

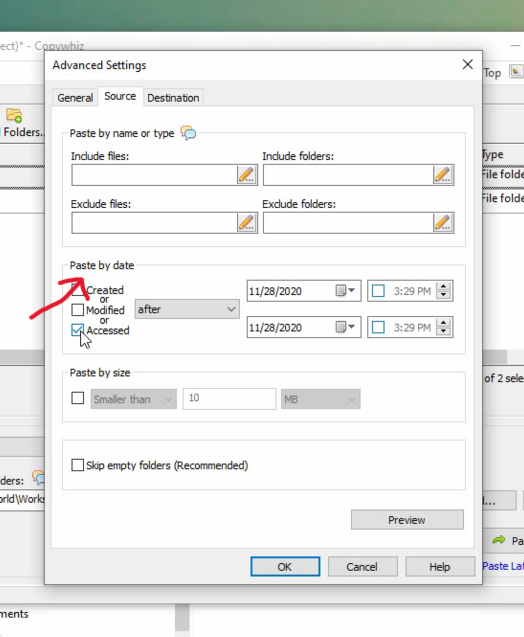
3. Go to the Source Tab and under the ‘Paste by date’ section, choose the criteria and specify number of days in the box.

You can preview the files that will be copied and skipped, before actually copying them.

4. Click on ‘OK’ and ‘Paste Now’.

The benefits

This feature removes the biggest difficulty we all face- remembering dates! This will also ensure you don’t spend time and effort copying extra or unwanted files due to the date ranges.

You can also schedule automatic file backups and take incremental backups using Copywhiz.

Learn more about Copywhiz. Download the free trial from here.

For short tutorial videos, Check out this page.

Subscribe to our YouTube channel for interesting videos.

Check out our other cool products.

Have a good day!

Thanks for your patience :)

Copy files simultaneously to multiple folders in Windows using Copywhiz

Everyday, we work with hundreds of files. Accessing them, copy-pasting, backing up etc. Copywhiz makes working with files easy and productive.

To help you in your daily file transactions, we have a really handy feature. Copy files to multiple folders (any number). With a special capability to copy files “simultaneously” to up to 10 destinations at once! You can customize this number.

What is Copywhiz?

Copywhiz enhances your file-copy experience by letting you to have more flexibility & control over the file copying and backup process.

Here is how Copywhiz makes file copying a breeze:

  • Copy only new or modified files
  • Easily pick files by name, extension, folder etc from bunch of folders
  • Automatically organize files based on file attributes and metadata
  • Copy files to multiple folders/computers
  • Copy files from multiple folders and paste them at once
  • Sync files between source and destination
  • Pick files from multiple folders and compress in single .zip file
  • Schedule file backups
  • Verify copied files for data integrity
  • Retain security attributes of files & folders (ownership/user access)
  • Several more hidden nuggets designed to make your file-copy task easier.
An image depicting one of the features of Copywhiz

Copy files to multiple folders at once

By default, Copywhiz will copy files to 5 destinations “simultaneously”. If you want to copy them to up to 10 destinations, go to the ‘General’ tab of Copywhiz Preferences.

Select the number from the drop-down. Copywhiz will copy to up to 10 destinations. If the number of folders are more than 10, Copywhiz copies files sequentially (one destination folder after another).

Steps to copy files to multiple folders:

After you have selected files in Copywhiz, go to the destination folder in File Explorer (Windows Explorer), right-click inside the folder, and choose Copywhiz Paste Advanced.

The Copywhiz window will appear where you can add more destination folders (comma separated). The bottom area of the Copywhiz window allows you to add multiple destination folders.

You can click on the ‘Add’ button to add a folder, click on the pencil icon to easily add or edit multiple items or you can also drag and drop folders inside the bottom area. 

 Here’s a short video depicting this feature:

This feature saves a lot of time and effort. You can copy to network folders and other PCs as well.

You can also schedule automatic file backups and take incremental backups using Copywhiz.

Learn more about Copywhiz. Download the free trial from here.

For short tutorial videos, Check out this page.

Subscribe to our YouTube channel for more interesting videos.

Check out our other cool products.

Have a good day!

Thanks for your time :)