Add/Remove Copywhiz menu from Windows File Explorer menu

This post is about a feature that will be really useful to people using portable version of Copywhiz and to those who wish to use keyboard shortcuts to copy and paste files in Windows File Explorer using Copywhiz.

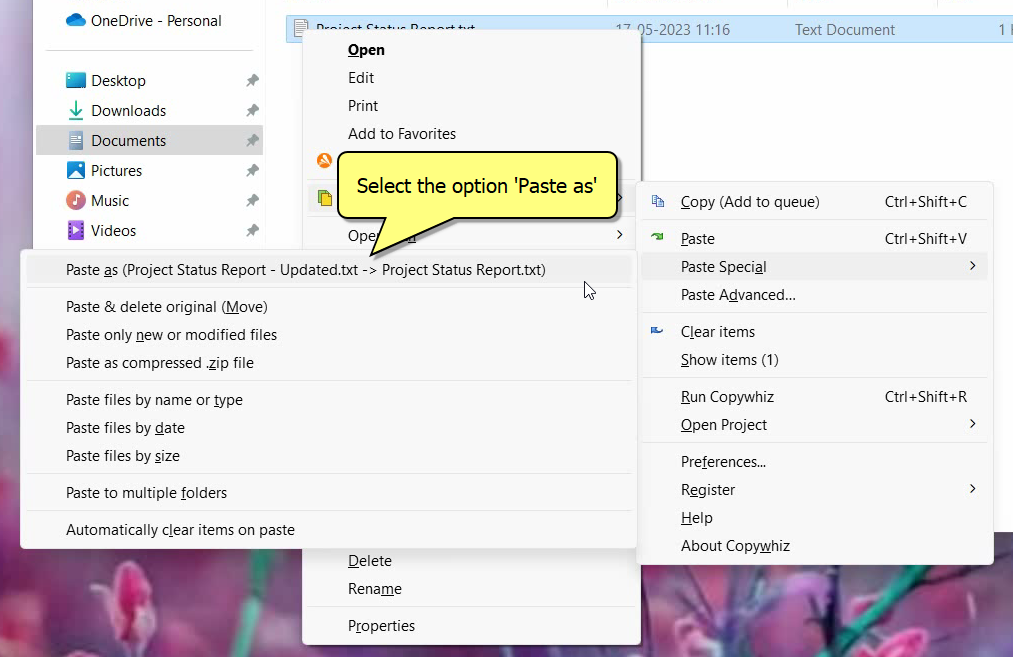
You now have the option to enable/disable the Copywhiz menu from appearing in the Windows File Explorer menu.

What is Copywhiz?

Copywhiz enhances your file-copy experience by letting you to have more flexibility & control over the file copying and backup process.

Here is how Copywhiz makes file copying a breeze:

  • Copy only new or modified files
  • Easily pick files by name, extension, folder etc from bunch of folders
  • Automatically organize files based on file attributes and metadata
  • Copy files to multiple folders/computers
  • Copy files from multiple folders and paste them at once
  • Sync files between source and destination
  • Pick files from multiple folders and compress in single .zip file
  • Schedule file backups
  • Verify copied files for data integrity
  • Retain security attributes of files & folders (ownership/user access)
  • Several more hidden nuggets designed to make your file-copy task easier.
An image depicting one of the features of Copywhiz

Enable/Disable Copywhiz menu in Windows File Explorer menu

To enable/disable Copywhiz menu in Windows File Explorer menu, just run Copywhiz, go to Preferences and check/uncheck the option ‘Show Copywhiz in Windows File Explorer’s menu’.


The Command prompt window will open after you click on ‘OK’. Press the enter key in there and wait.

Really simple!

Learn more about Copywhiz. Download the free trial from here.

For short tutorial videos, Check out this page.

Subscribe to our YouTube channel for interesting videos.

Check out our other cool products.

Have a good day!

Thanks for your patience :)

Copywhiz 6 is here!

Hi everybody! 

Happy to announce that we have launched a new version of Copywhiz-Version 6.0! 

Let’s take a look at What’s New in Copywhiz 6.

What is Copywhiz?

Copywhiz enhances your file-copy experience by letting you to have more flexibility & control over the file copying and backup process.

Here is how Copywhiz makes file copying a breeze:

  • Copy only new or modified files
  • Easily pick files by name, extension, folder etc from bunch of folders
  • Automatically organize files based on file attributes and metadata
  • Copy files to multiple folders/computers
  • Copy files from multiple folders and paste them at once
  • Sync files between source and destination
  • Pick files from multiple folders and compress in single .zip file
  • Schedule file backups
  • Verify copied files for data integrity
  • Retain security attributes of files & folders (ownership/user access)
  • Several more hidden nuggets designed to make your file-copy task easier.

Features Added

The new Copywhiz has made organization of your files simpler and easier than ever before! How?

  1. Organize files based on their attributes:

The biggest addition to Copywhiz is the file Organizer. You can organize files in the destination folder, based on attributes such as name, type, date, size, etc.

You can also easily reorder or delete the order of criteria. There is also a preview option to display the structure before pasting.

The option is available in the ‘Destination’ Tab of the Copywhiz Advanced Settings Window.

2. Organize audio/media files based on their metadata

Another useful feature is for those of you who use .mp3 files on a daily basis. Generally, we keep a lot of mp3 files on our system if we’re fond of music or if our job demands it. But organizing these files is a time-consuming task, particularly if the count is hundreds. 

You can use Copywhiz to organize these mp3 files based on their metadata like song, artist, album, track, etc.

This option is an extension of the Organizer.

3. Sync your source and destination folders

Sync, here means to keep the same set of files in the source and destination folder. Automatically remove a file from the destination folder when it is removed from the source folder.

This feature is used along with the ‘Automatically identify and paste only new and modified files’ feature. The option is available in the ‘General’ Tab of the Advanced Settings Window.

4. Verify data integrity of copied files

To check if all files have been copied successfully without any corruption, we have introduced the option to verify files after they have been copied or transferred from one location to another.

The verification will be visible in the file copy progress box.

5. Copy files to every sub-folder inside the destination folder

We have also added an option to paste a copy of your files to each sub-folder in the destination folder. You may choose to paste them under all sub-folders or all first level sub-folders or all folders having a particular name.


6. Copy files to specific sub-folders in the destination folder

If you don’t want to create a copy of the files in all folders or sub-folders, then you can choose to create a copy in only specific sub-folders.

7. Copy only files created/modified/accessed in the last ‘X’ days

This feature is a step forward in selective file copy. Now you can choose to paste only those files that have been created, modified or accessed in the last ‘X’ days. You can specify any number of days.

8. Paste files to up to 10 destinations at once

Lot of our users had asked for this feature and we have answered the request. You can now paste files simultaneously to up to 5-10 destinations at a time.

This will make copying files to multiple destinations much faster.

9. Disable the Copywhiz menu in the Windows File Explorer menu

Many users did not want Copywhiz menu to appear in the Windows File Explorer menu. They prefer to use keyboard shortcuts to copy and paste files using Copywhiz.

So we have offered the option to disable the Copywhiz menu in the Windows File Explorer menu. You can enable it again anytime later from the General Tab of Preferences menu.

10. Better organization of Copywhiz features

We have changed the view of the Advanced Settings Tab and the various features are split into three different tabs based on their functionality.

This will make it easier to find a particular option instead of searching for it.

Hope this new Copywhiz proves useful and help you work conveniently.

Do let us know what you feel about these new features. We are constantly listening and improving.

Download Copywhiz from here, if you still haven’t. We have 7 day fully functional free trial. Upgrade to Copywhiz 6 if you already have Copywhiz. Contact us for more details.

Do follow our YouTube Channel where we upload interesting videos of Copywhiz.

Have a good day!

Thank you.

Organize music/media files inside folders based on metadata

If you’re someone who has a lot of music or audio files on your system, this post is definitely for you.

Organizing these mp3 files is no easy task. It takes a lot of time and effort, which is why we don’t do it often in the first place. 

But don’t worry. Copywhiz has a solution for this! What is it? Keep reading in order to find out.

What is Copywhiz?

Copywhiz enhances your file-copy experience by letting you to have more flexibility & control over the file copying and backup process.

Here is how Copywhiz makes file copying a breeze:

  • Copy only new or modified files
  • Easily pick files by name, extension, folder etc from bunch of folders
  • Automatically organize files based on file attributes and metadata
  • Copy files to multiple folders/computers
  • Copy files from multiple folders and paste them at once
  • Sync files between source and destination
  • Pick files from multiple folders and compress in single .zip file
  • Schedule file backups
  • Verify copied files for data integrity
  • Retain security attributes of files & folders (ownership/user access)
  • Several more hidden nuggets designed to make your file-copy task easier.

Organize mp3 files based on their metadata

Metadata is basically the identifying information associated with your song, such as the song title, artist, composers, title of the album, year released, track number, genre, etc.

Using Copywhiz, you can organize your audio files in folders, based on these metadata. Not just one, you can create a folder structure with multiple metadata.

Here is a short video that depicts it perfectly:

1. After you select your files in Copywhiz, go to the destination folder and Choose ‘Copywhiz -> Paste Advanced’.

2. The Copywhiz main window will open. Choose the Advanced Settings Tab from there.

3. Go to the Destination Tab and choose the ‘Organize files inside folders based on name, type, date, etc.’ option.

4. Open the Organizer window. Choose ‘metadata’ from the file property drop-down. You can also add multiple criteria and easily reorder, update or remove the criteria.

There is also a Preview option so you can view the structure before pasting.

5. Click on OK and Paste Now.

To conclude

You would have realized how handy this feature is. Saves a lot of time and effort and is also very easy to use.

You can also schedule automatic file backups and take incremental backups using Copywhiz.

Learn more about Copywhiz. Download the free trial from here.

For short tutorial videos, Check out this page.

Subscribe to our YouTube channel for interesting videos.

Check out our other cool products.

Have a good day!

Thanks for your time :)

Verify the data integrity (checksum) of files copied in Windows using Copywhiz

We like to be double sure, as humans, of the things we do or the products we use. Before taking a decision, we check its integrity. 

Copywhiz believes in the same idea. We understand that it is very important to check the integrity of your copied data and files. We have therefore rolled out a new update to Copywhiz that offers this important feature – verify the data integrity (checksum) of each file copied.

What is Copywhiz?

Copywhiz enhances your file-copy experience by letting you to have more flexibility & control over the file copying and backup process.

Here is how Copywhiz makes file copying a breeze:

  • Copy only new or modified files
  • Easily pick files by name, extension, folder etc from bunch of folders
  • Automatically organize files based on file attributes and metadata
  • Copy files to multiple folders/computers
  • Copy files from multiple folders and paste them at once
  • Sync files between source and destination
  • Pick files from multiple folders and compress in single .zip file
  • Schedule file backups
  • Verify copied files for data integrity
  • Retain security attributes of files & folders (ownership/user access)
  • Several more hidden nuggets designed to make your file-copy task easier.
Schedule_File_Copy
An image depicting one of the features of Copywhiz

Verify the data integrity of files using Copywhiz

Here’s a short video on this feature:

1. After you select your files in Copywhiz, go to the destination folder and Choose ‘Copywhiz -> Paste Advanced’.

2. The Copywhiz main window will open. Choose the Advanced Settings Tab from there.

3. Go to the General Tab and choose the option ‘Verify files (checks data integrity of files copied)’.

4. Click on OK and proceed with ‘Paste Now’ option.

The progress of your file check will visible when your files are being copied.

The benefits

This is a really handy feature if you work with a large number of files on a daily basis. Also, if you are copying files over a network, it is very useful. You can imagine the amount of time, effort and errors this feature can save.

You can also schedule automatic file backups and take incremental backups using Copywhiz.

Learn more about Copywhiz. Download the free trial from here.

For short tutorial videos, Check out this page.

Subscribe to our YouTube channel for interesting videos.

Check out our other cool products.

Have a good day!

Thank you :)

Sync files between source and destination folders using Copywhiz for Windows

Copywhiz has recently added the feature to keep your source and destination files in sync. This means that Copywhiz will ensure that the source and destination folders are exactly the same by copying only the difference (copy only new or modified files) and also by deleting anything from the destination that has been deleted from the source folder.

What is Copywhiz?

Copywhiz enhances your file-copy experience by letting you to have more flexibility & control over the file copying and backup process.

Here is how Copywhiz makes file copying a breeze:

  • Copy only new or modified files
  • Easily pick files by name, extension, folder etc from bunch of folders
  • Automatically organize files based on file attributes and metadata
  • Copy files to multiple folders/computers
  • Copy files from multiple folders and paste them at once
  • Sync files between source and destination
  • Pick files from multiple folders and compress in single .zip file
  • Schedule file backups
  • Verify copied files for data integrity
  • Retain security attributes of files & folders (ownership/user access)
  • Several more hidden nuggets designed to make your file-copy task easier.

Keep source and destination folders in sync using Copywhiz

Here’s a short video on this feature:

1. After you select your files in Copywhiz, go to the destination folder and Choose ‘Copywhiz -> Paste Advanced’.

2. The Copywhiz main window will open. Choose the Advanced Settings Tab from there.

3. Go to the General Tab and choose the option ‘Automatically identify & paste only new or modified files’. After that, select the option ‘Delete files from destination if deleted from source’.

4. Click on OK and proceed with ‘Paste Now’ option. The files will be pasted and the folders will be set to sync.

5. Save the project to run it again in the future.

The next time you make any changes in the source folder, run the saved project file. The folders will sync and the changes will be reflected in the destination folder as well.

Closing comments

This is a really handy feature and very easy to understand and use.

You can also schedule automatic file backups and take incremental backups using Copywhiz.

Learn more about Copywhiz. Download the free trial from here.

For short tutorial videos, Check out this page.

Subscribe to our YouTube channel for interesting videos.

Check out our other cool products.

Have a good day!

Thanks :)
Automatically organize files in separate folders based on file attributes

Here is an exciting feature of Copywhiz. It can now automatically copy files in a folder structure based on file properties such as file name, file extension, file type, file size, date modified/created/access and also mp3 metadata like artist, album, genre, title etc.

If you have your project documents, pictures, music files, video files scattered all over your hard drive, this tool will set it all right in few minutes.

Manually copying these files and then pasting them to folders is very time consuming, especially if they are large in number.  For this reason, we just dump these files in a few limited folders and end up in a clutter. This reduces our productivity.

What is Copywhiz?

Copywhiz enhances your file-copy experience by letting you to have more flexibility & control over the file copying and backup process.

Here is how Copywhiz makes file copying a breeze:

  • Copy only new or modified files
  • Easily pick files by name, extension, folder etc from bunch of folders
  • Automatically organize files based on file attributes and metadata
  • Copy files to multiple folders/computers
  • Copy files from multiple folders and paste them at once
  • Sync files between source and destination
  • Pick files from multiple folders and compress in single .zip file
  • Schedule file backups
  • Verify copied files for data integrity
  • Retain security attributes of files & folders (ownership/user access)
  • Several more hidden nuggets designed to make your file-copy task easier.

Organize files by attributes

Here is a short video to guide you:

  1. After you select your files in Copywhiz, go to the destination folder and Choose ‘Copywhiz -> Paste Advanced’.

2. The Copywhiz main window will open. Choose the Advanced Settings Tab from there.

3. Go to the Destination Tab and choose the ‘Organize files inside folders based on name, type, date, etc.’ option.

4. Open the Organizer window. Choose the file property from the drop-down. You can also add multiple criteria and easily reorder, update or remove the criteria.

There is also a Preview option so you can view a sample folder structure.

5. Click on OK and proceed with ‘Paste Now’ option.

Why this feature?

This feature saves a lot of time and effort. You don’t have to sit down and sort your files anymore. Copywhiz does it for you in a matter of seconds.

You can also schedule the project to automatic organize your files at specific intervals using Copywhiz.

Learn more about Copywhiz. Download the free trial from here.

For short tutorial videos, Check out this page.

Subscribe to our YouTube channel for interesting videos.

Check out our other cool products.

Have a good day!

Thanks for reading :)

Tag files and folders directly from Windows File Explorer using RecentX

Tagging items is a great option to organize your content. The same goes for the files and folders in your system as well.

We have another good news for you. RecentX now supports tagging of files and folders directly from Windows File Explorer.

Most of us don’t tag our files and folders in Windows since either we don’t know how to or it is a complicated procedure for us.

This is not the case with RecentX. Tagging anything, be it files, folders, programs, website history, or clipboard history, is smooth.

Read this blog post for more clarity:

This post will provide you more details into this.

What is RecentX?

RecentX is a smart launcher for Windows designed to make your computing life joyful. Here are some of the many cool things you can do with RecentX:

  1. Effortlessly access any file, folder or program on Windows in less than 5 seconds!
  2. Assign tags to frequently used files/folders. Makes things even faster.
  3. Integrates with Windows File open/save window so that you don’t have to navigate any folder when opening or saving a document.
  4. It has a clipboard manager too that remembers all the text & pictures copied to a clipboard so that you can quickly pick & paste them again.
Tags

Tagging Files & Folders

Tags or labels are one of the most used features of RecentX because you can easily group items based on projects, topics, etc.

Here’s a short video depicting this feature:

These are the steps to tag files and folders directly from Windows file explorer, using RecentX:

  1. Go to Windows File Explorer.
  2. Right-click on the file(s) you wish to tag and choose the ‘Tag files/folders’ option.

3. The RecentX Tags window will open where you can assign tags.

4. Click on ‘OK’ and the tag will be assigned immediately.

5. You can go to RecentX and click on the tags to find your files there.

Tagging folders is also done in the same way as files.

An easier way to tag files and folders is to drag and drop it from within RecentX over the tag button to assign that tag. You can also drag and drop from Windows File Explorer over the tag button to assign that tag.

Why RecentX?

You now have seen how easy it is to assign tags using RecentX. Unlike Windows, the procedure is much simpler.

Another limitation that Windows has is that it only permits tagging of images, videos, and documents. You might not see the tagging option even on supported file types on rare occasions, depending on the file format.

Also, if you use a different file system, or transfer or shift your files to other computers or external hard drives and thumb drives, then the tags do not stay. Tagging of folders is also not supported in Windows.

All these factors make RecentX a good alternative to Windows File Explorer when you want to tag files and folders.

Another cool thing about RecentX is that it allows searching by multiple tags also. Hold the Ctrl key and select the second tag button from the toolbar in RecentX. You will see the second tag being added automatically.

Download RecentX for free, from here.

For tutorial videos, check out this page.

Check out our YouTube channel.

Have a good day.

Thanks for reading :)

RecentX update: Dark mode introduced!

We love using apps in dark mode. Apps like Twitter, Instagram and even YouTube have rolled out dark modes.

I think we all can agree that there is something really soothing and visually appealing about the dark mode. It also gives relief to our eyes that might get strained looking at the bright light of our PC and mobile screens. Another good thing is that dark mode reduces battery usage of devices and therefore ensures longer battery life.

Joining this trend is RecentX. After requests from users, we have finally introduced a dark mode option in RecentX.

What is RecentX?

RecentX is a smart launcher for Windows designed to make your computing life joyful. Here are some of the many cool things you can do with RecentX:

  1. Effortlessly access any file, folder or program on Windows in less than 5 seconds!
  2. Assign tags to frequently used files/folders. Makes things even faster.
  3. Integrates with Windows File open/save window so that you don’t have to navigate any folder when opening or saving a document.
  4. It has a clipboard manager too that remembers all the text & pictures copied to a clipboard so that you can quickly pick & paste them again.
This is how it will look

How to activate dark mode?

Open the RecentX Window and go to the ‘Advanced’ tab on the top.

Select the ‘Preferences’ option and you will find the setting there.

You can switch back to the normal light mode anytime.

Hope you enjoy using RecentX even more after this update.

Download RecentX for free, from here.

For tutorial videos, check out this page.

Check out our YouTube channel.

Have a good day.

Thanks for your time :)

Tag/label folders in Windows using a Windows File Explorer alternative

We have hundreds of folders in our systems. And it gets really hectic to look for specific files lost somewhere in the lot.

Tagging folders is therefore what i would suggest. Just like how you tag files, tagging folders will help you stay organized and makes things more accessible.

In our previous post, we gave steps on how to tag files directly from Windows File explorer, using RecentX, and why it is better than Windows.

Windows offers the ability to tag files. But it only permits tagging of images, videos, and documents. You cannot tag any other type of file in Windows. Plus Windows doesn’t let you tag a folder.

This post will show you how you can tag folders in Windows using the Windows File Explorer and an alternative software, RecentX. RecentX lets you tag any file or folder. This is the most important difference between RecentX and Windows tagging system.

This post will tell you how to tag folders directly from File Explorer using RecentX. You will be able tag even files in the same way.

What is RecentX?

RecentX is a smart launcher for Windows designed to make your computing life joyful. Here are some of the many cool things you can do with RecentX:

  1. Effortlessly access any file, folder or program on Windows in less than 5 seconds!
  2. Assign tags to frequently used files/folders. Makes things even faster.
  3. Integrates with Windows File open/save window so that you don’t have to navigate any folder when opening or saving a document.
  4. It has a clipboard manager too that remembers all the text & pictures copied to a clipboard so that you can quickly pick & paste them again.
Folder Launcher

Tagging folders using Windows File Explorer

Sadly, Windows does not have a direct way to tag folders. You have to use third party apps to do that.

But don’t worry. RecentX has you covered.

Tagging folders from Windows File Explorer using RecentX

Here’s a short video about this feature:

Here are the steps to follow:

  1. Go to Windows File Explorer.
  2. Right-click on the folder(s) you wish to tag and choose the ‘Tag files/folders’ option.

3. The RecentX Tags window will open where you can assign tags.

Click on ‘OK’ and the tag will be assigned immediately.

5. You can go to RecentX and click on the tags to find your files there.

We also have an easier way to tag whereby you can drag and drop the folders from within RecentX over the tag button or drag and drop from Windows File Explorer over the tag button to assign that tag.

Conclusion

Tagging things with RecentX is fast and easy. All your items can be accessed quickly.

You can do a lot more with RecentX. It has amazing features you should definitely try.

Another cool thing about RecentX is that it allows searching by multiple tags also. Hold the Ctrl key and select the second tag button from the toolbar in RecentX. You will see the second tag being added automatically.

Download RecentX for free, from here.

For tutorial videos, check out this page.

Check out our YouTube channel.

Have a good day.

Thank you :)

Tag/label files in Windows using a Windows File Explorer alternative

Tags or labels are very important when working with files. They help you stay organized and increase productivity by saving your time and effort on looking for things.

We know that Windows offers the ability to tag files. But it only permits tagging of images, videos, and documents. You cannot tag any file in Windows. Plus Windows doesn’t let you tag a folder.

This post will show you how you can tag files in Windows using the Windows File Explorer and an alternative software, RecentX. RecentX lets you tag any file or folder. This is the most important difference.

What is RecentX?

RecentX is a smart launcher for Windows designed to make your computing life joyful. Here are some of the many cool things you can do with RecentX:

  1. Effortlessly access any file, folder or program on Windows in less than 5 seconds!
  2. Assign tags to frequently used files/folders. Makes things even faster.
  3. Integrates with Windows File open/save window so that you don’t have to navigate any folder when opening or saving a document.
  4. It has a clipboard manager too that remembers all the text & pictures copied to a clipboard so that you can quickly pick & paste them again.
Tags

Tagging files using Windows File Explorer

Windows has two methods to tag files. One is from the Properties Windows and the other from the Details Pane.

Since tagging from the Details Pane is a bit easier than the former, we will see the steps for this.

  1. Open the File Explorer using the keyboard shortcut ‘Windows+E’.
  2. In the File Explorer click on the “View” tab and select the “Details Pane” option from the navigation pane. The Details pane will appear on the right side of the File Explorer.

3. To tag a file, select the file from the main window and then add tags in the Tags field appearing in the Details panel. Click on Save.

That’s it.

Tagging files from Windows File Explorer using RecentX

Before we look at the steps, here’s a short video depicting the steps:

Let us look at the steps to do this using RecentX:

  1. Go to Windows File Explorer.
  2. Right-click on the file(s) you wish to tag and choose the ‘Tag files/folders’ option.

3. The RecentX Tags window will open where you can assign tags.

4. Click on ‘OK’ and the tag will be assigned immediately.

5. You can go to RecentX and click on the tags to find your files there.

We also have an easier way to tag whereby you can drag and drop the files from within RecentX over the tag button or drag and drop from Windows File Explorer over the tag button to assign that tag.

Our Verdict

Both Windows and RecentX have minimal steps to tag files.

However, there’s a twist here. Windows has a limitation so it only permits tagging of images, videos, and documents. You might not see the tagging option even on supported file types on rare occasions, depending on the file format.

Also, if you use a different file system, or transfer or shift your files to other computers or external hard drives and thumb drives, then the tags are removed.

Thereby, we would definitely go with something reliable like RecentX.

Another cool thing about RecentX is that it allows searching by multiple tags also. Hold the Ctrl key and select the second tag button from the toolbar in RecentX. You will see the second tag being added automatically.

Download RecentX for free, from here.

For tutorial videos, check out this page.

Check out our YouTube channel.

Have a good day.

Thanks for your time :)