Hey Guys! This blog post will guide you step-by-step on how we can replace a file with another file having a different name using two methods: PowerShell and Copywhiz. This technique is useful for updating files, correcting errors, or revising content without altering the original file’s location or permissions.
Let’s explore Copywhiz first.
What is Copywhiz?
Copywhiz enhances your file-copy experience by letting you to have more flexibility & control over the file copying and backup process.
Here is how Copywhiz makes file copying a breeze:
- Copy only new or modified files
- Easily pick files by name, extension, folder etc from bunch of folders
- Automatically organize files based on file attributes and metadata
- Copy files to multiple folders/computers
- Copy files from multiple folders and paste them at once
- Sync files between source and destination
- Pick files from multiple folders and compress in single .zip file
- Schedule file backups
- Verify copied files for data integrity
- Retain security attributes of files & folders (ownership/user access)
- Several more hidden nuggets designed to make your file-copy task easier.
Below is a short video for further reference:
Video Transcription:
- As shown in the video, we already have a file.
- And we also have is the new updated file.
- We will now copy the new file and replace the old.
- Select the file into Copywhiz.
- Now, go to the destination, right click and select Copywhiz ‘Paste Special’ option.
- Select the option “Paste as”
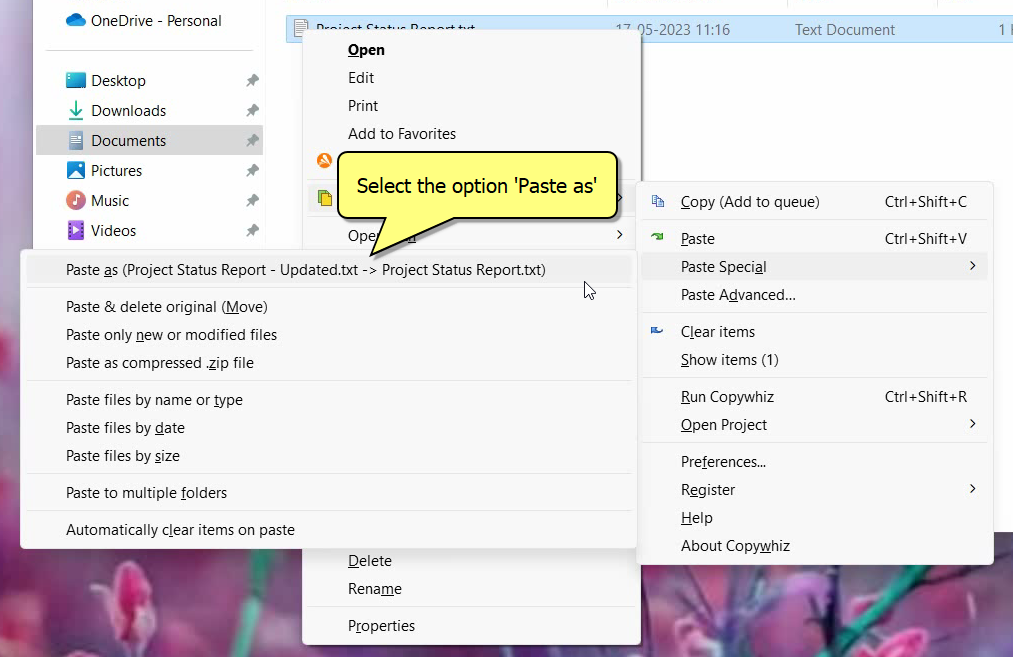
- As we see in the video, the file contents have been updated and the file name remains intact.
Step-by-Step Guide: Using PowerShell
PowerShell provides a scripting interface for advanced file operations, including copying and replacing locked files. Here’s how to do it:
1. Copy Locked Files Using PowerShell
Locked files can’t be copied directly while they’re in use. However, you can:
- Use Volume Shadow Copy Service (VSS) to create a snapshot of the disk and access locked files from the snapshot.
Steps:
- Open PowerShell as Administrator.
- Use the
DiskShadowcommand to create a shadow copy:diskshadow create expose shadow=<shadow_id> <drive_letter> - Navigate to the exposed drive and copy the locked file using
Copy-Item:Copy-Item "<source_path>" -Destination "<destination_path>"
2. Replace Files on Reboot
To replace a file that is in use, the system must be instructed to perform the replacement during the next reboot.
Steps:
- Use the
MoveFileExAPI via PowerShell to schedule the replacement:[DllImport("kernel32.dll", SetLastError=true)] static extern bool MoveFileEx(string lpExistingFileName, string lpNewFileName, int dwFlags); $existingFile = "C:\\path\\to\\lockedfile.txt" $newFile = "C:\\path\\to\\replacementfile.txt" MoveFileEx($existingFile, $newFile, 0x4) # 0x4 indicates the MOVEFILE_DELAY_UNTIL_REBOOT flag - Restart the system to apply the change.
Why Choose Copywhiz:
Copywhiz, is designed with simplicity and efficiency in mind. It:
- Saves time by automating complex tasks.
- Provides advanced features like file filtering and backup options.
- Ensures a seamless experience with minimal effort.
For most users—especially those without advanced scripting knowledge—Copywhiz is the ideal solution for managing locked files and scheduling file replacements.
Conclusion
Copywhiz simplifies the process for everyone. By choosing Copywhiz, you gain a reliable, efficient, and user-friendly solution for copying and replacing locked files.
Download Copywhiz today and experience hassle-free file management like never before!
Subscribe to our YouTube channel for interesting videos.
Check out our other cool products.
Have a good day!
Thanks :)